As a photographer, you have to know about several best ways to adjust your images to a particular photography style. In earlier days, we have covered how to edit your work by using many Lightroom. I am ready to talk about Liquify Tool Photoshop editing more.
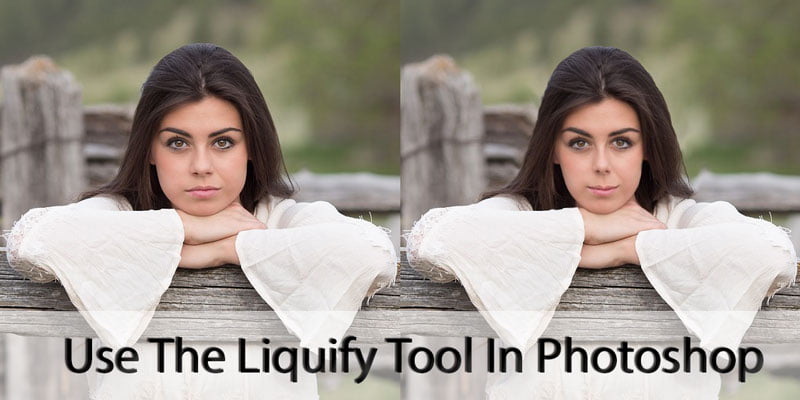
The Liquify tool is one of the most important filters in Adobe Photoshop. You can distort the pixels in a picture without losing quality, which is one of the pictures that your wedding customers get. Let’s talk about numerous ways to use Photoshop liquify tool.
Liquify Tool In Photoshop
The liquify tool is known as the liquify filter. That can be used for artistic effects in Photo manipulation and Image retouching. The pixels of an image can rotate, pull, pucker, push, bloat and reflect.
This tool makes images of people and products, particularly effective, which is great for you as a photographer who takes part in wedding and engagement days.
As a photo editing service providers for professional photographers, we have that much knowledge about the use of adobe photoshop.
I can understand that how important your unique photography design is to your work. And I can also edit your pictures by using adobe photoshop.
Liquify Tool In Photoshop
This is a DIY Tutorial, helping you to learn about the liquify tool in photoshop. In addition, I’m sharing tips on, how can you use this liquify tool for making your images realistic?
Furthermore, I’m giving you some quick tips that will help you to learn about the liquify tool.
Note Some Fundamental Uses of Liquify Tool
- You can use a liquify filter to any bitmap layer, but you can’t implement the liquify filter to a smart object.
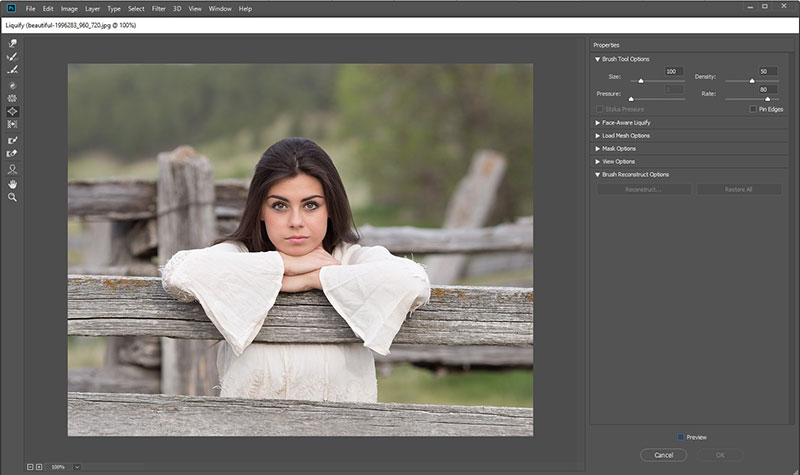
- The Liquify filter can be reached by tapping on the button Filter then choose “Liquify.” The Liquify dialog box will be displayed there.
- Choose Advanced Mode for getting more choices for the liquify filter.
Quick Tips and Shortcuts for Liquify Tool
When working with the Liquify tool, many keyboard shortcuts are easily accessible. See a short list underneath the top:
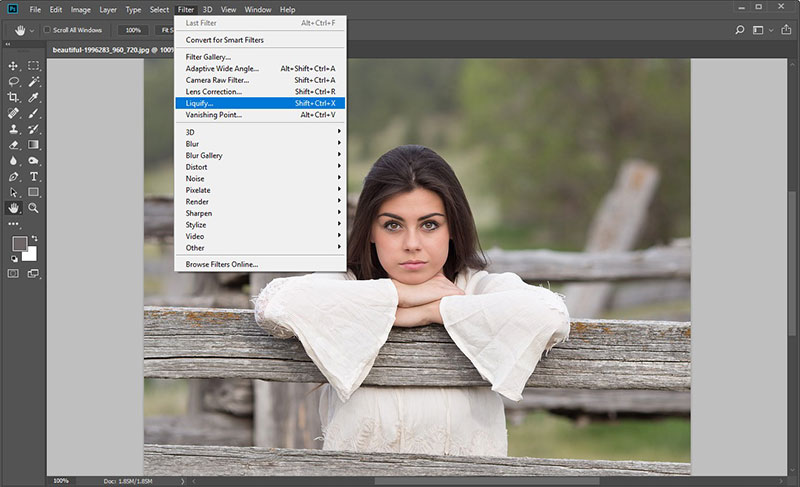
- Press Command/ Ctrl + shift +X to open the liquify tool in Photoshop. Or you can navigate Menu bar >> Filer >> Liquify.
- Command/Ctrl + is one of the first shortcuts to zoom in on a keyboard.
- Next, another keyboard shortcut is The Command/Ctrl – key use for zoom out.
- You can use another keyboard shortcut to push down the Space bar key so that you can press and drag the image as required.
- You can also use Command/Ctrl + 0 as a keyboard shortcut that suits the image and continue its aspects ratio.
- The Command/Ctrl + 1 is a common keyboard shortcut to use, that sets the picture zoom back to 100%.
Access Adobe’s complete list for knowing more about Photoshop keyboard shortcuts.
Liquify Filter Tools
In the Liquify filter dialog box, there are many tools. For more details to see a shortlist below:
Forward Warp Tool

One of the first tools that can be important to know about from begins with the Forward Warp tool. the Forward Warp device pushes the image pixels onwards when you drag.
First fix the brush size for control the pixels that you push. To fix the brush size, access the Brush Options on the right side of the toolbar.
Reconstruct Tool

Learn about the next tool which name is Reconstruct Tool. In Adobe Photoshop, any distortion you apply to the picture is removed by the Reconstruct tool. To use the Reconstruction feature Press on Restore All Button in the Reconstruct Options section.
Twirl Clockwise Tool

The Twirl Clockwise tool is also another tool you may use to fix your images. This tool rotates the pixels in the direction of the clock. To rotate the pixels like clockwise, you can drag and press on the picture.
Usually, press Alt down for PCs / Option Mac and drag on the image if you really want to pull the pixels anti-clockwise.
Pucker Tool

Puker Tool is a part of the Liquify filter dialog box. In the center of the brush area, the Pucker tool transfers the pixels. Drag the picture to move the pixels on the part of the center.
Bloat Tool

The Bloat tool is an extremely useful tool that can be used in the Liquify filter dialog box for working on your wedding images. The “Bloat” tool eliminates pixels from the brush area. Drag onto the picture to move the pixels out of the middle.
Push Left Tool

The Push Left tool is the final option in the Liquify dialog box. It transfers pixels to the left or right based on your acts with the Push Left” button. As you move the tool up, the pixels are shifted to the left.
When the tool is dragged down then pixels are moved to the left. To gain this, click on the Option for Mac/ Alt for Pcs as you move on the image.
Tool Options
There are many tool options in the dialog box that you can use based on your necessity. If you have your own unique style which requires particular adjustments for your wedding photos, then these tools are perfect for you to use.
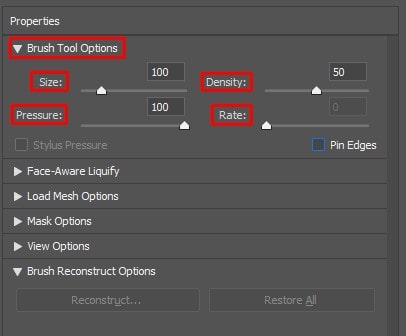
Size Of The Brush
You can change the brush size in the Liquify dialog. You can fix the width of the brush by selecting the brush size.
The Density of The Brush
The brush density in the Liquify dialog box is the next choice in Photoshop. You can adjust how the brush feathers are on the edge of the picture with the choice of brush density.
The Pressure of Brush
The Liquify dialog box is another way you can fix brush pressure. You can alter the speed of the brush shifting while the brush moves on the picture with the brush pressure function.
Rate Of The Brush
The brush rate in the Liquify dialog box can also be set in Photoshop. The brush speed function helps you to assess how fast the brush makes if you have a tool picture.
Stylus Pressure
You can also fix a final option to change style pressure for your wedding pictures. The stylus pressure option is available only if you use a stylus tablet and the pressure readings are used in this tool.
Now that we’re going to cover photoshop options and tools, we can go through the ways to change your images by using the Liquify filter.
How to Distort The Image
Photoshop’s first option to optimize and change the Liquify tool is to distort your images. You can modify the picture, distort, or exaggerate your image to look different from the actual one, if you take the steps to distort the picture.
Follow these steps to distort the image in Photoshop:
- For distorting the image, choose a layer. After that, you need to choose a particular area if you would like to distort only a section of the layer.
- Go to the Options bar and Press the Filter Option and choose the liquify tool.
- Free any layer areas you don’t want to change.
- For making the appropriate distortion, you can select any of the liquify tool which is listed in overhead respectively.
- After that, press ok for closing the dialog box and use the distortion.
Some Quick Tips For Correcting The Image Distortions
To correct the picture distortions, press the Options button for / Mac/ Alt for the PCs and hit the Reset button. For this, All options will be reset to defaults.
Use Thaw And Freeze Masks
You can use the Thaw mask and Feeze mask for that area which you would like to make editable or for that area which you wouldn’t want to fix. You can learn more about these two masks which I am given below:
Use Freeze Mask

The “freeze mask” helps to protect picture areas from being adjusted. one of the maskings is called the “freeze mask”. For adding the “Freeze Mask” you need to follow these guidelines:
- Choose the Freeze Mask tool first.
- Move the tool throughout the area you want to protect from modifications.
- Click and press down the Shift+Click buttons. It makes a straight line between the two click points.
Use Thaw Mask

Another mask is called the “Thaw Mask” . for a few reasons we can use this mask, such as:
Invert Frozen Areas
For the invert frozen areas you need to go to the Mask Option, you can press Mask All.
Hide or Show The Frozen Areas
To hide or show the frozen areas, you also need to go in the View Options area first and then choose the Show Mask.
Change The Color Areas Of Frozen Areas
You may choose a color in the View Options area to choose the Mask Color option.
To use the Thaw Mask for the frozen areas then follow these instructions:
- Choose the Thaw Mask tool.
- On the frozen area transfer the Thaw Mask tool.
- To thaw in a straight line respectively two click points, Tap Shift + Click button.
Quick Tip
By clicking on “None” in the “Mask Options” section, you can thaw all frozen areas.
Additional Mask Options
In Photoshop, we just replaced the masks of “Freeze” and “Thaw.”There are many other ways in Photoshop that you can use as masks, such as:
“Replace” Selection
Replace selection is one of the first choices. Clicking the selection Replace button for demonstrates the mask, transparency or selection which is in the actual picture.
“Add To” Selection
Add to selection is the second option. The mask in the actual image is shown in this option to be added with the Freeze Mask tool. The selection Add to applies chosen pixels to the current frozen field of the image in Channel.
“Subtract From” Selection
The selection subtract from is the next choice for you. This selection can reduce the channel pixels from the current frozen area of the image.
“Intersect With” Selection
The Intersect With selection is another choice if you want to use it as just a mask in Photoshop. The Intersect With selection uses actually frozen pixels and is used just in the area of the image.
“Invert” Selection
The last choice is to select the Invert selection. Selecting Invert uses of particular pixels to invert the frozen picture area is already frozen.
DIY: Use A “Mesh”
In Photoshop, when you work on your photographs, you may make any changes to your pictures before you can see an appropriate look. You can use a Mesh in photoshop to control distortions in a picture.
A Mesh helps you to secure your picture so that you don’t need to edit it. This method, you can start again without editing, when you want to go back to its original edition.
Pick the color and size
- In the View options section of the dialog box, right-click on the Show mesh.
- Color and size should also be selected.
Only Show A Mesh
You just choose the Show Mesh but remember that don’t choose the Show Image.
Save Distortion Mesh
- Press the Save Mesh option.
- Select a location and name for the Mesh.
- Press Save.
Use Saved Distortion Mesh
- Choose the Mesh file to use.
- Press Open to apply the Mesh.
Quick Tip
To put in the last saved distortion Mesh, press on Load Last Mesh.
“Face-Aware Liquify” Tool
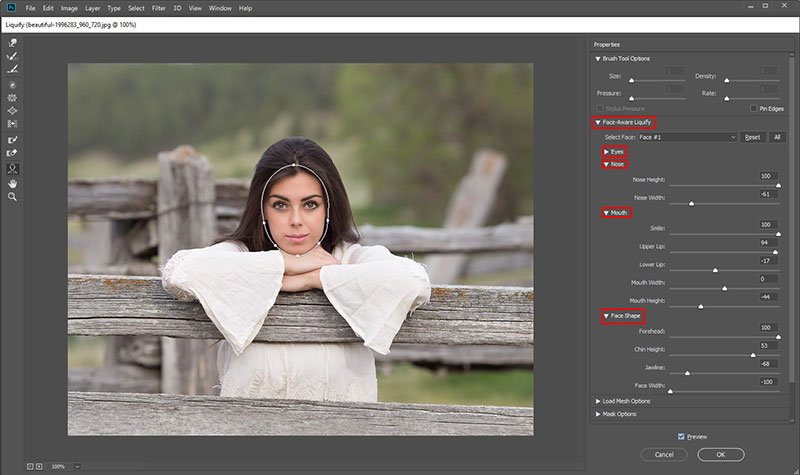
The Face-Aware Liquify tool recognizes facial features is yet another function of Liquify’s filter. Nose, Mouth, Eyes, and more are part of that.
These are facial characteristics that can be harder to edit because they are so small. The tool is designed to make facial improvements as necessary.
Quick Tip
For the fully editable editing of your photo, use the Face-Aware Liquify tool as a smart filter. It helps to make sure the untouching of your original image. Follow these instructions to do this:
- Choose a layer, which name is Smart Object. You can find the layer panel here.
- Select the Filter and choose in the liquify option.
Here are some tips about how to use the Face-Aware Liquify tool to make facial adjustments in Photoshop.
Use On-Screen Handles
The first way you can change facial characteristics is to use handles on the screen. With the following steps, use this option:
- Open a picture of one or two faces in Photoshop.
- To open the dialog box, tap on the Filter, and choose Liquify.
- You need to choose the Face Tool in the tool panel. On your mouse, you can also click on A. The faces of your picture are automatically recognized by this gesture.
- Start with any of the picture faces and hover your mouse through with it. The keys show across the face on the screen.
- Make facial changes and repeat them for others as needed.
- To make the adjustments, press the button OK.
Use Sliding Controls
One method that you can use is sliding controls to correct the facial features. You can use this part with the following instructions:
- Open a picture of one or several faces in Photoshop.
- To open the dialog box, click on Filter, and then choose Liquify.
- In the tool panel choose the Face tool On your keyboard, you may also click on A button. This activity immediately recognizes the faces of your picture. The faces also can be found in the menu Select Face which seems in the area of the Properties panel of the face-aware liquify area. Through pressing on the picture or choosing from the menu, you can pick a different face.
- Use the following sliding controls to create facial changes and to recreate the other ones.
- Modify the sliders in the Face-Aware Liquify area to alter the face characteristics. Eyes, mouth, nose and facial shape include many of the sliders.
- When the adjustments are made, press OK.
A Few Quick Tips
- To lock the right and left eye settings together, tap the link icon on the toolbar to help you create asymmetric eye effects.
- The Face-Aware Liquify tool is suitable for face-side features. Rotate titled faces, if necessary, before using the settings.
- Reset adjustments to faces, using the options All and Reset in the field Face-Aware Liquify.
Install Graphics Processor
Make sure you install the graphics processor instead of using the “Face-Aware Liquify” tool. To accomplish this, take these steps:
- you can select Edit option then hover-over Preferences and then choose the Performance.
- In the Graphics Processor Settings sector, choose Use Graphics Processor.
- Press Settings Advanced. Make sure “Computer Acceleration Graphics Processor Using” is selected.
- To save the setting, press OK.
Conclusion
If you want to learn how to use Liquify tool Photoshop’s, it can assist you to modify your wedding picture to make unforgettable pictures that your clients like.
The more satisfied you are with Photoshop, the quicker you get. It saves you time in the process of photo editing, which means it can be used in other important fields of your company. Photoshop isn’t the only program that you can master after processing.
You may read more: