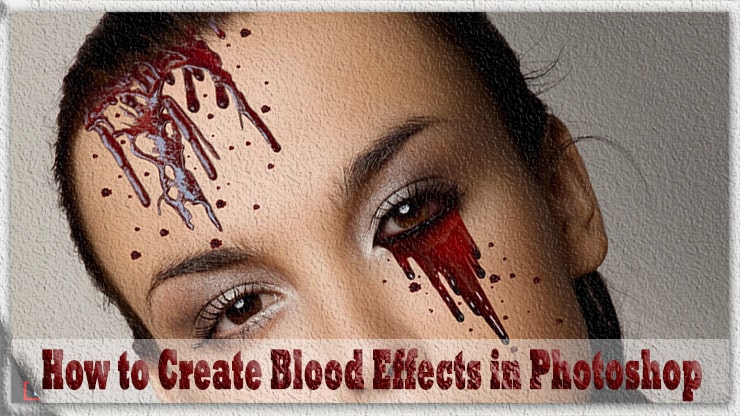
Creating blood effects in Photoshop can add a horrifyingly authentic touch to your digital artwork or photo manipulations.
Whether you are designing a vampire-themed poster or creating a gory zombie illustration, learning how to create blood effects can take your digital art skills to the next level.
Photoshop offers a wide range of tools and techniques that can help you achieve the desired blood effect, from realistic splatters to dripping blood.
Photoshop is like the symbolic heart of every graphic designer. Knowing about the usage and tools of Photoshop is necessary in recent times.
Read this step-by-step tutorial and it will help you learn how to make blood effects on Photoshop without taking extra courses.
How to Create a Beauty Color Grade For Blood Effects
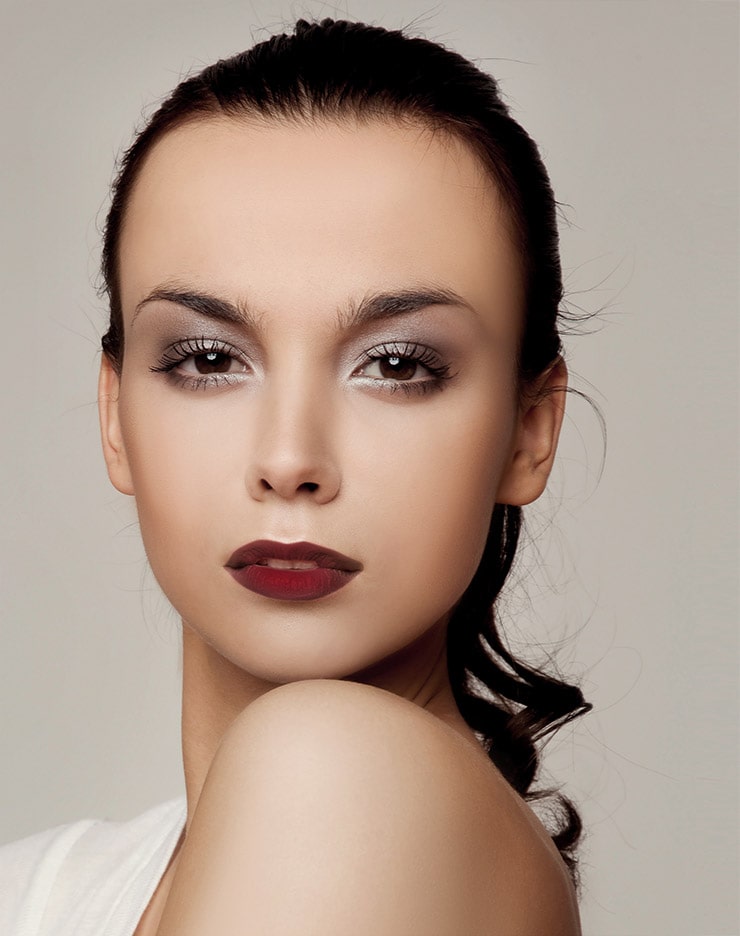
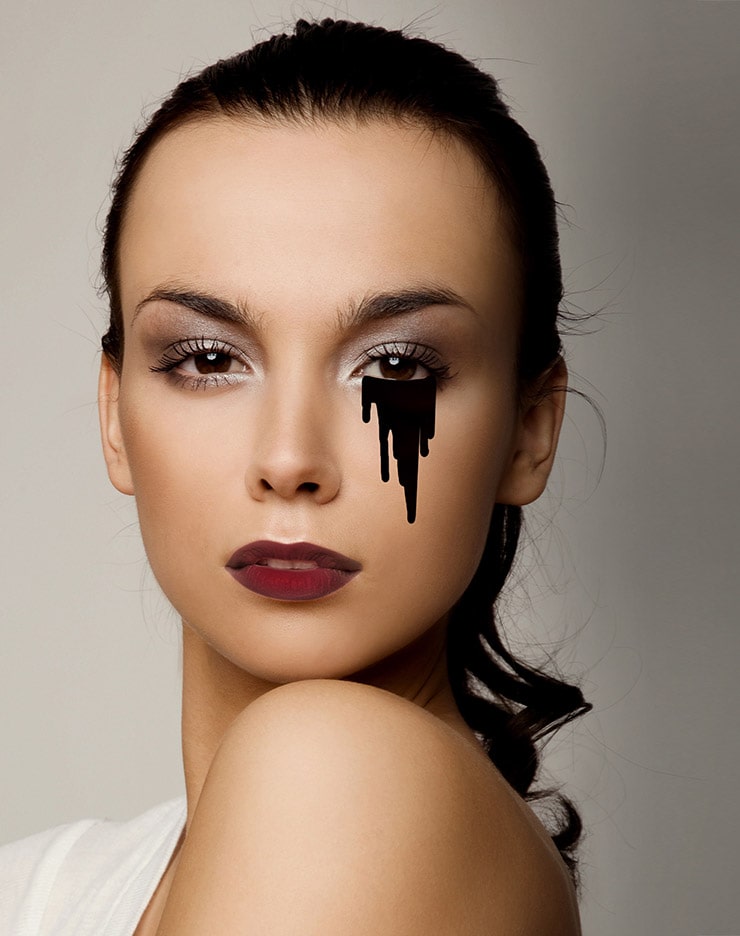
This step is the initial step of applying the blood effect. To start the task, I will use this particular picture to show the process.
I will, at first, fix and change some color grading. You must ensure you don’t apply a bright change in the grading. A mild and subtle change will do the job.
To understand the whole procedure thoroughly, I will acknowledge the steps shown:
Step 01: Add Brightness

Begin with an adjustment layer of the picture’s brightness or contrast. This should be done right on top of the subject layer. Ensure that the brightness is -28; if you focus on the contrast, set it to 9. Please make both adjustments together.
Step 02: Create a Color-grading Group

Now, create a group in Adobe Photoshop and have to name it ‘color grade.’ Here, place three different layering adjustments. Make sure the adjustment layers stay at the top of the layer stack.
Now, apply the layering adjustment names color lookup. Set the layer to foggy night, at the opacity rate of 16%. Also, set the layer mode to multiply.
Step 03: Selection of Colors

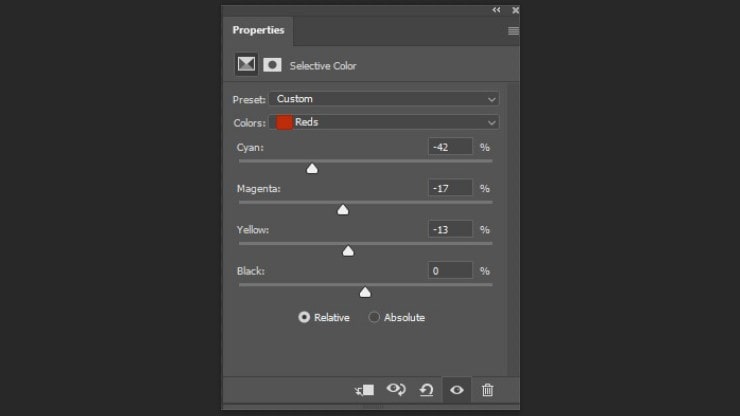
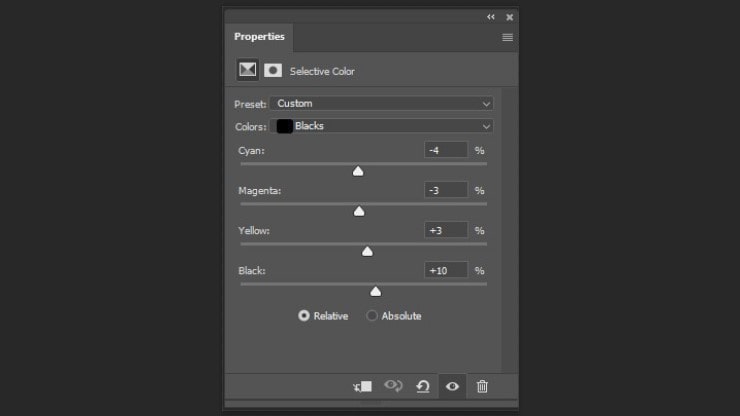
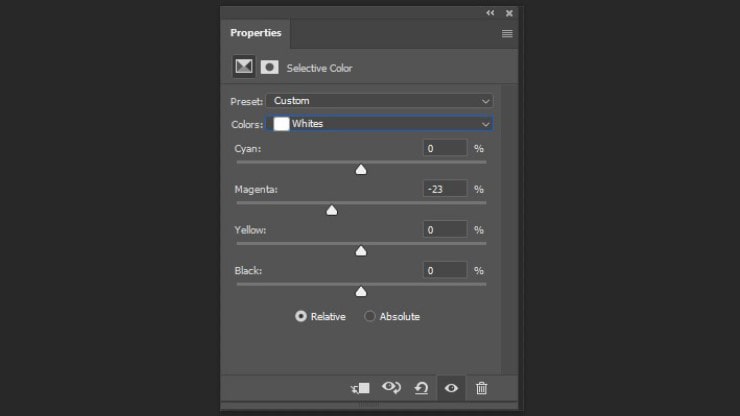
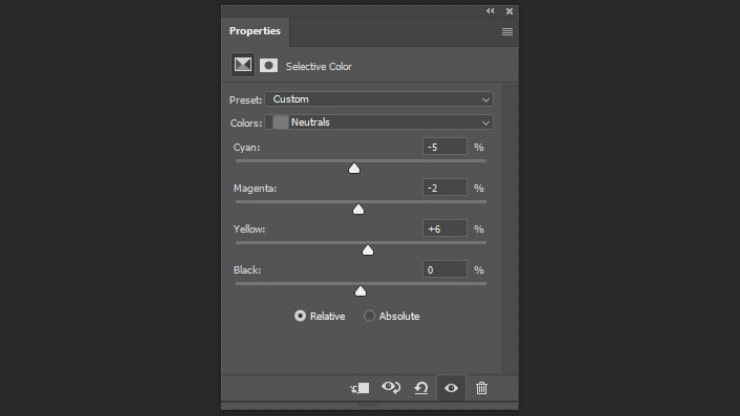
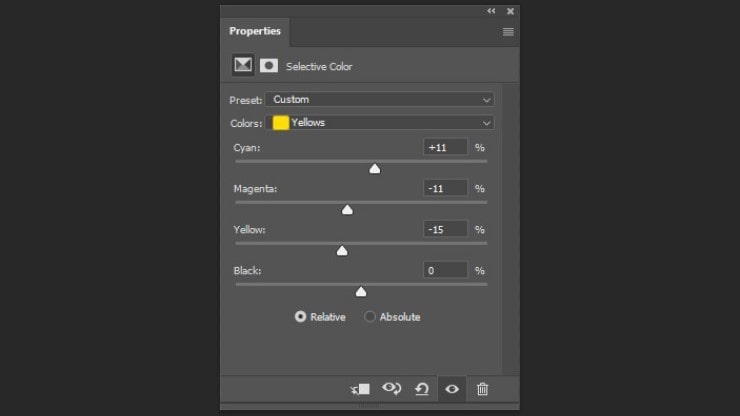
Next, make the opacity rate 28% for a specific coloring. Set in some layering adjustments of selective colors. Make sure the selective colors affect the reds, naturals, blacks, yellows, and whites.
Step 04: Using Blend if Settings
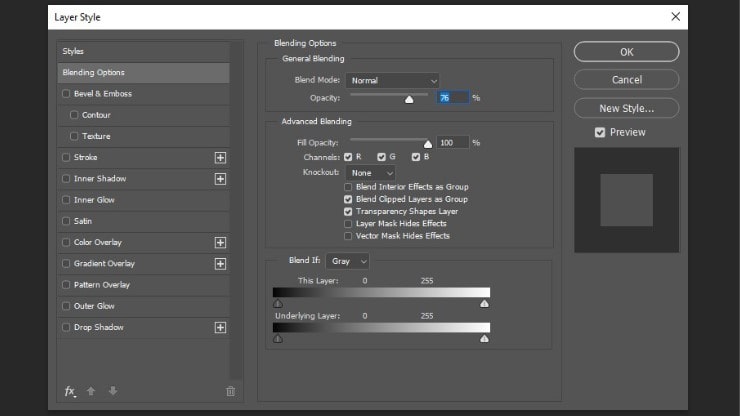
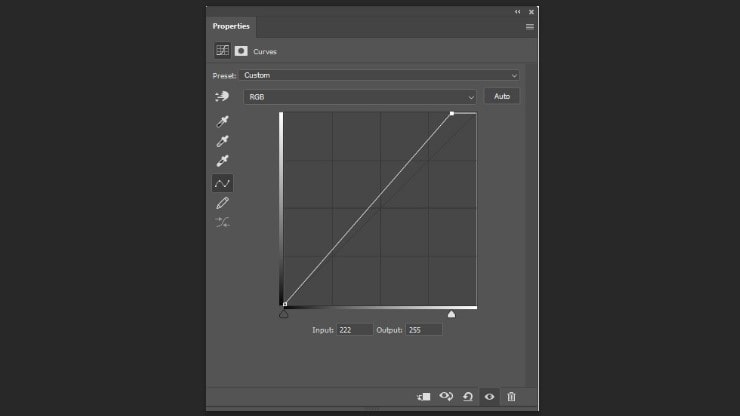
A curve adjustment layer is necessary to finish the color grading procedure. The top anchor point has to be pulled slightly towards the inward. Then, set the opacity to 75% and the setting adjustment blend.
Press the Alt key when adjusting the blend If option. This will allow breaking them into two parts.
These are the steps that are crucial to set the color grading. You have to keep in mind that the group you created should be collapsed. Also, the layers formed afterward will be placed below those existing groups and on top of the brightness layer.
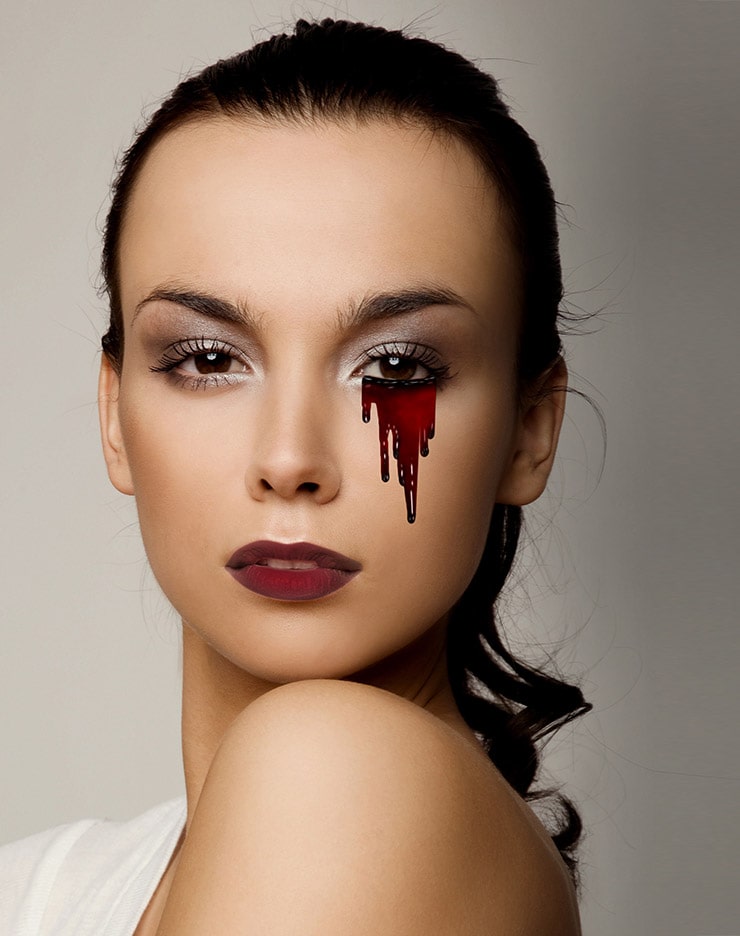
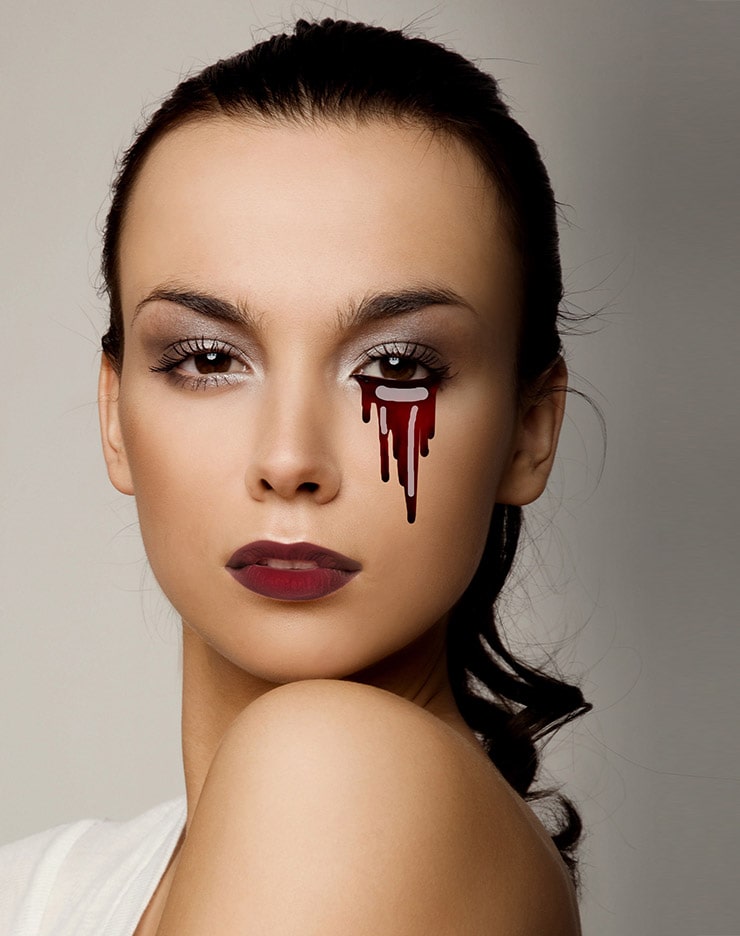
How to Create Blood Tears in Adobe Photoshop
Here comes the star of the show. Now, I will start working on creating the blood tears. This particular section will help us to create a fake blood tear. Let’s get back to the steps.
Step 01: Color Selection for Blood Tear Effect
To start the process, I will be creating blood effects Photoshop with the help of color sample sets. Those sets of colors will have five different shades. The color code and names of these shades are black, light red #a6180c, medium red #5d0d0e, dark red #22050a, and white.
Step 02: Add Blood Base
You will need a new layer to set everything in place from this point. Please create a new layer and make sure to set it to multiply. I designed and painted the blood base using the dark red color I chose. You can generally go for the shape you want your blood to resemble.
The shape can be either dripping or near dried blood tears. Apply the round and hard paint brush to sketch the blood. If the person painting is new to Photoshop, it is better to use any reference image.
Otherwise, diving into our imagination power and giving the blood tear a life is better. Now, to draw the blood, use a pen tablet, making it easy to sketch out the blood. Make sure to set the opacity pressure of the pen tablet off and toggle on the pen pressure.
However, you can also use a premade blood tear that Photoshop creators have already created.
Step 03: Add Blood Base Layer
The next part is creating a new layer for the blood effects Photoshop. Here, I will use medium red and brush the middle part of the blood tear. I will fill in the blood base, excluding the dripping and the blood-flowing area.
Make sure to use a round and soft brush so it gets easy to fill the color. You have to avoid the dripping and flowing areas of the blood tear. These are the parts where the color should be dark and thick. Thickness of the blood will ensure a darker red color, which is necessary.

Step 04: Create the Motion of Blood Tears Flowing
Now that I have completed the previous layer, it is time to create another layer. This layer is about painting the bright red base using the same round, soft brush. I need to set the brush flow rate to 10% to show the blood flow.
The flow rate of 10% should work better since I will use my tablet to brush the blood tear. Since setting the opacity low, use the mouse to do the job. In that case, the mouse pressure opacity should be extremely low. A percentage of one should do the job to ace the flow rate.
To understand the technique of darker to lighter, I have to know where the tear is thicker. I understand that the tear flows from heavy to light, leaving traces as it flows. So, the under-eye blood tear will be darkest, and the teardrop flowing will be lightest.
To show the motion of the flow, the bright red color does the job. Now, when the blood’s tear stops flowing, the residue that the blood leaves gets stuck. Hence, you can see that the blood tear, where it is contained, gets a bit darker.
To show the same motion of flow and concentration, you need to utilize the applied theory to color it. Since the tear is transparent and has no color, the light does all the shading. You can see through the tears and understand where the dark shade is and where it is lighter.
You simply have to apply the same method. Avoid shading the under-eye part of the blood tear and the droplets. Paint the rest of the base bright red with a low flow rate to show transparency.

Step 05: Enhance the Shape
YOU MUST ENHANCE THE SHAPE since I am done with the base of my blood tear Photoshop. For that, again, create a new layer. Then, make sure to set the opacity rate of the brush to 50 percent.
This layer is crucial and necessary since this layer will define the blood tear shape. Use red color to enhance the shape and highlight the shades. Also, further paint into the base creates a darker shadow and deepens the blood drop.
Such steps will ensure that the border and shadows are appropriately highlighted. Also, the shades will look sharper and more defined.
Step 06: Adding Shadow Effect
Now that you are done with the enhancement and shaping of the tear droplet of blood, it requires more features to add. The part gives a shadowy effect on the blood tear. The shadow effect will add extra weight and dimension to the blood.
Create another new layer and set it to multiply. This time, create the layer below where the blood base was made. Now, use a color that will represent the shadow tone of the blood base. Since the color is multiple shades of red, use brown to create the shadow color.
Remember to use a saturated brown color that is light and not too dark. The code of this saturated brown color is #370e00. The next step is to shade the brown color. Use a round and soft brush with a low flow rate.
Here is the thing: do not apply the shadow where the blood tears flow. Use the brown shade under the dark red color, the under-eye area, and the droplet ending area. These are the places where the blood color is darker. So, the shadow will enhance the look.
Also, consider that the shadow is not that vibrant since the blood must look like the light is blocked from entering the blood.
Step 07: Create a Custom Brush
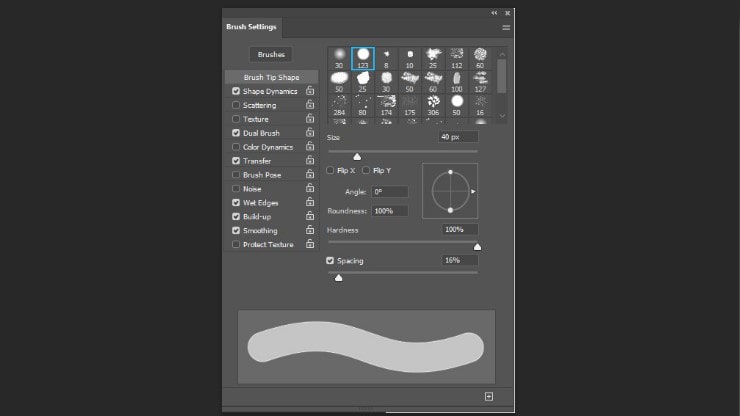
Before getting into a new segment, create a new item that will help make the blood tear Photoshop. Set a new brush, or create a new custom brush. However, apply the stiff round brush before creating a new custom brush.
Here is how to create a new custom brush using the hard round brush. Let’s start with the brush’s tip size and the shape’s dynamics. Set the brush to 40 px as size and 16% as spacing. The size jitter in the shape dynamics should be exactly 50%.
Next is the dual brush. For this, use Photoshop’s default brush, which is a round and soft brush. Set the brush size to 115%, 100% as the spacing. Along with that, set the scatter percentage to 20 and put the count to 2.
Now for the tick marking option that you will see in the settings box. You simply have to make sure to tick or check mark the options name transfer, wet edges, build up, and smoothing.
Step 08: Name the New Custom Brush
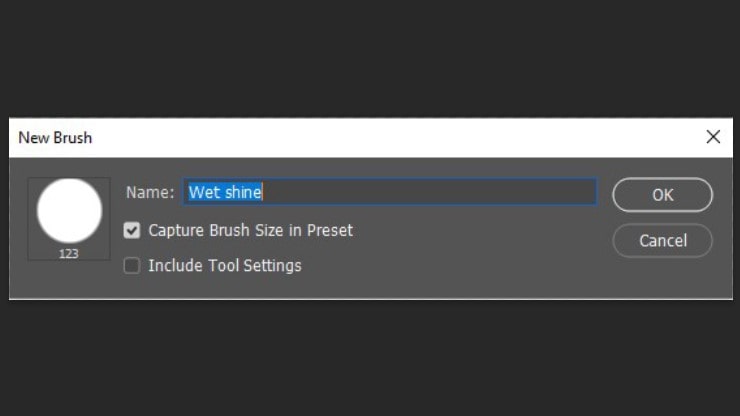
Now that you are done setting up the new brush tool for our task, there is one more task left. Save this created brush, naming it ‘Wet Shine,’ and hit the Create new brush button. You will find the option at the bottom right corner of the panel.
Another important thing you might miss is to mark the ‘capture brush size in preset’ mode.
Step 09: Add Highlights to The Blood Base

Now comes the best part of the overall blood tear Photoshop. Let’s begin the highlights now. For that, please create a new layer above the blood base layer and its clipped layers. Make sure to set 90% as the opacity.
This is where the fun begins. Apply the self-made custom brush to do the highlights. For the highlights, use the color white so that it seems like the light is reflecting. For this blood tear, set the brush size to 3 px to 6 px.
The brush size may vary since you must ensure the highlight resembles the light reflection. Some parts may require a little highlight so that a small brush size will do the job. Then, there are parts where bigger highlights are necessary, for which bigger brushes will be used.
Remember that you have to highlight the areas where the blood is darker. Since the concentrated area will be deeper in color, highlighting them heavily will ace the task. For a better touch in the highlights, use the eraser option to shape the highlights or give a fade shade.
Using the eraser brush will ensure that the highlights are not bold and quirky at the same time.
Step 10: Create a Blob Highlight
Create a new layer, and apply some bigger and larger highlights. This time, draw a bigger spot on the darker blood area. Use the drip brush with white color to paint the area where the blood is darker.
Step 11: Add Gradient Effect

Now, use a layer mask option on the spots you created using the drip brush. This layer masking will provide the effect of a gradient being added there. That blood highlight effect will be vivid and visible with the layer masking, making the blood look real.
Also, it will give a better touch than the blood-dripping effect.
Step 12: Create Overlay Enhancements

At this point, create another layer, setting it to overlay. This time, paint multiple shades of red around the eyes and where the blood is darker. This method will portray a better lighting effect around the blood tear. This overlay layer will also enhance the shadow effect on the blood base.
Step 13: Re-using the Blood Base

Now, use this particular base and copy-paste it around anywhere in the face. This will help to create the actual blood effect.
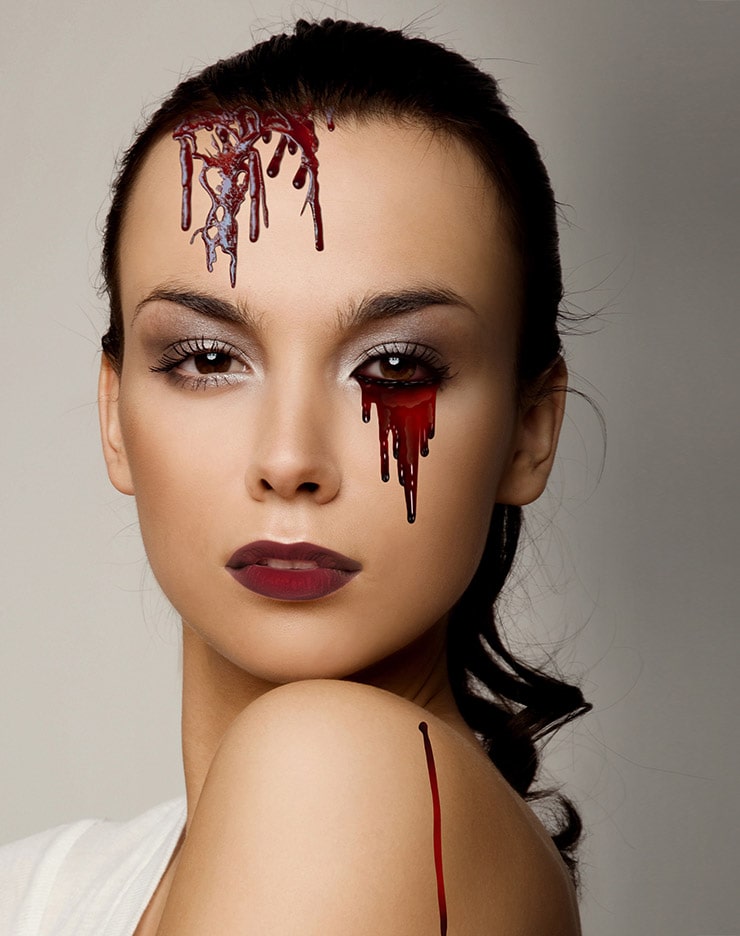
How to Create a Blood Drip Effect in Photoshop
You can create instant blood dripping effects as a special effect. The following steps will show you how to create the blood drip effect in Photoshop.
Step 01: Create a Blood Drip Base

This method is now the most straightforward in Photoshop. Just as I did in the previous task, making the tear, now I will create a single drip.
Follow the same method, like creating a new layer and setting the layer to multiply. Then, add the blood base color paint in dark red. For the drip effect, draw a curved line. You can either draw it or use the premade Photoshop blood brush.
Step 02: Enhance the Drip Using Eraser

At this point, take help from the eraser brush to define the curved line. Erase the top and bottom so that it looks like two uneven balls. Then, drag the eraser brush so the line looks like an uneven drip. You can save this blood brush Photoshop for further use for drip effect.
Step 03: Color the Blood Drip Base

Fill the blood drip base with a medium and light red color to show a huge blood effect.
Step 04: Add a Shadow Effect on the Blood Drip
Apply a shadowy effect on only the top and bottom layers of the blood drip.
Step 05: Add the Highlights

Do the same task as before. Apply the highlights on only the top and bottom part of the blood drip. This highlight will define the light reflection on the darker blood base.
Step 06: Use the Grouping Tool for the Drip Base

Now, for the grouping part of the blood Photoshop, use the lasso tool and create a selection. This selection will be around the one end of the blood drip base. Then, add a layer mask effect to the group.
To show a falling drip effect, place the masked drip base on top of the single drip base.
How to Create Fake Blood Splatter in Photoshop
Create a believable and realistic blood splatter effect in Photoshop for the actual task. Go through the same procedure as before, but the catch is the ways are easier now.
Step 01: Create a Blood Splatter Base

Create a new layer and then set the layer to multiply. Now, use the blood splatter brush that Photoshop has built. Use the brush from the Envato elements and paint the blood splatters in a bright red color.
Step 02: Paint the Blood Splatters

Now, create a new layer once again, and this time, clip the layer. Make sure to clip the layer into the blood splatter layer and set the layer to multiply.
Now, paint the dots between the blood splatter effects in medium or dark red. For this splatter, use the round and soft brush to paint them thoroughly. Don’t forget to cover the more minor bright red splatter spots.
Step 03: Highlight the Blood Splatters

Now for the last and final task for the blood splatter Photoshop. Create a new layer right above the splatter and shading layers. Then, paint the dots in bright white color in each darker red color. This will give a natural highlight look on the splatter spots.

Now, it depends on how big or small the paint will be. If the splatters are big, paint more white inside for the light reflection effect.
That’s it! You can use These steps and rules to create a realistic yet simplistic blood tear Photoshop.
FAQs
To create blood effects in Photoshop, you can use various tools and techniques such as brushes, textures, blend modes, and filters. You can use Photoshop actions available that can help you to create realistic blood effects.
You can create a dripping blood text effect in Photoshop using a combination of layer styles, brushes, and textures. You can also follow the tutorials available that provide step-by-step instructions on how to achieve this effect.
To make it look like blood in Photoshop, you can use a combination of blending modes, textures, and brushes. Experimenting with different techniques and adjusting the settings can help you achieve the desired blood effect.
To create an instant blood-dripping effect in Photoshop, you can use a combination of a blood layer and a text layer. By applying specific layer styles and using brushes, you can achieve a realistic blood-dripping effect quickly.
The blend mode you should use to create a blood effect in Photoshop depends on the desired result. Experiment with different blend modes such as Multiply, or Screen to achieve the desired effect.
To paint blood in Photoshop, you can use a hard round brush and apply red colors with varying opacities. You can also use other brush settings to add more realism to your blood effects.
This blood splatter Photoshop is necessary if people try to create a blood tear effect in Photoshop. This blood splatter will help set a realistic tone and better effect the blood base. Hence, people only require this blood splatter Photoshop to create a real scenario.
Final Words
As a graphic designer, knowing about these simple yet valuable effects will often come in handy. At some point, clients might come up with such demands and quotations, which is why knowing the tools, techniques, and usage of the brushes is necessary for sudden cases.
However, this particular tutorial will also be helpful for those people who want to learn Photoshop. More specifically, this will help me learn how to make blood effects on Photoshop easily.
This will be the first step to creating many other things in Photoshop that will help in the future. This can be an extra-curricular skill or a tool for finding the perfect job.
You may read: