Make a logo? Here, I am going to share easy tips & secret strategies in this Photoshop logo design tutorial. Follow this to the end and you will able to make your own logo in photoshop cc 2020.
The logo is the identity & key factor of a business organization. A well meaningful symbolic logo is an easy way to create a positive impact on the audience’s mind. If you can create an efficient logo with the eye-catchy color combination, it will make the communication easier & create the most important first impression.
It is the best way to make your company stand out in the competitive business world. Besides, there is a huge demand for a logo designer. So, it is beneficial not only for your business but also you can earn money by making an elegant logo. Let’s learn how to make a professional logo in photoshop.
Why Logo Design in Photoshop?
Photoshop is the most popular software because of it’s versatile features & amazing tools. This is an all in one editing software. So, most of the people dislike paying new software for only making the logo.
By the way, here I pick the giant editing & designing software photoshop cc 2020 to create a simple logo. The basic quality of a logo is must have scalability ability without losing quality. This is why it is ideal to design a logo in vector-based software such as Illustrator. Whereas photoshop is the pixel-based software that is also suitable for a logo but not best.
This guideline is for those people & make them relief by sharing steps by steps guideline on how to make a standout logo in photoshop cc. As our guideline is for a beginner we will demonstrate a simple elegant logo. The tool we used here is given-
- Shape Tools.
- Gradient Tools.
- Text Tools.
How to Make a Logo in Photoshop CC 2020
Are you wondering to see the popular brand logo & curious to know how to
I guess you are wondering how to make a logo by using these simple tools. Go through this Logo Design Tutorials step by step, your concept will be clear. You will be ready to make your own logo.
Create a New File
Open your photoshop CC 2020. Now select File> New & you will get a window like the below images.
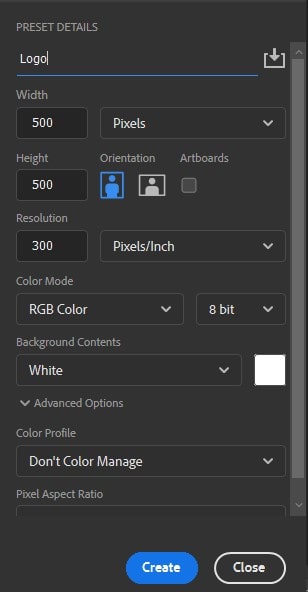
Now set the project name as logo. Set the width500px & height 500px. The logo would be scalable so the larger size won’t be a problem. After setting the size, click ok & a new file is successfully created.
Now Select Edit> Preferences > Guides, Grid & Slices & you will get a window like the below images.
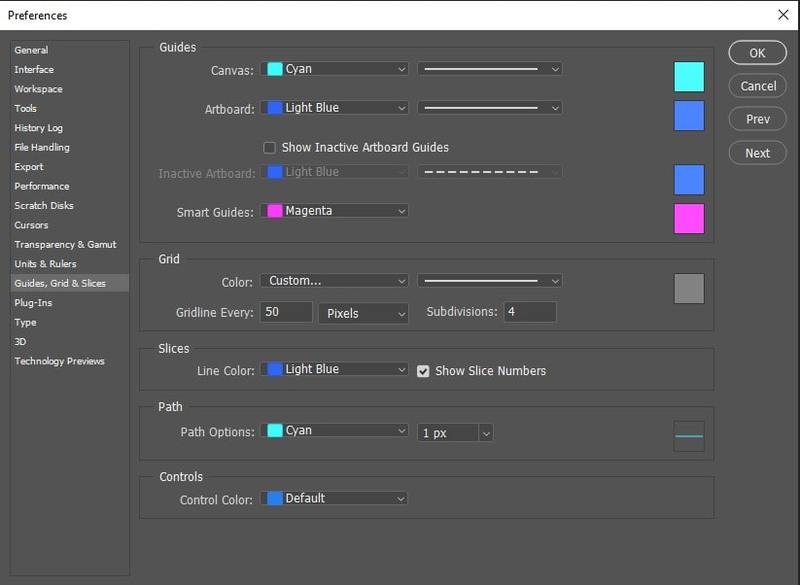
Set the gridline every 50px. Now you need to activate the grid in your file. You can active it by shortcut cmd + ` or Select View > Show > Grid. Also, check that Snap to Grid is activated by clicking View > Snap To > Grid.
Create a Basic Shape
From the toolbar pick the pen tool or enter “P” to select the pen tool. Now check the Options Bar whether it is selecting as shape or not. If not replace the path & select the shape. You need to find the center point to start the shape. Select View> New Guide> Select orientation as horizontal & position 50% then select Ok. Similarly select View > New Guide> Select orientation as vertical & position 50% then select Ok. Now you get the middle point of your canvas.
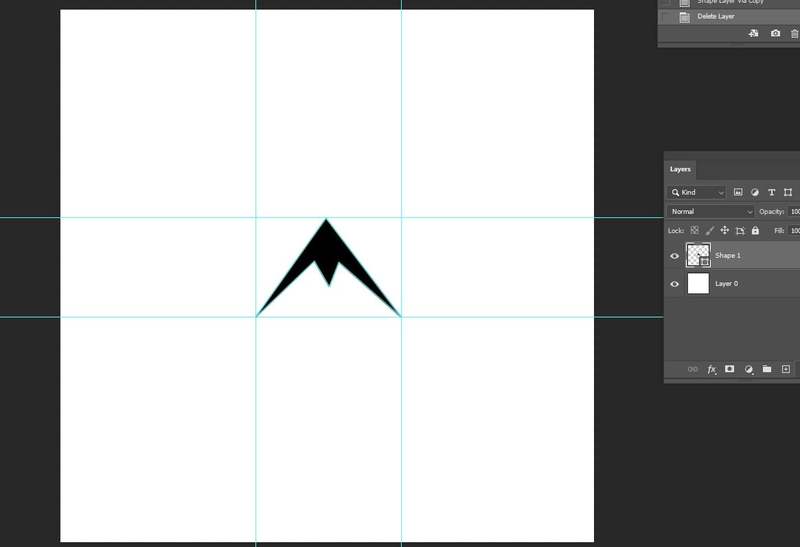
Draw the shape using the pen tool. At first click on the center point then use grid-lines to draw two equal sizes arrow shape together. You can modify the Layer name & rename it with a double click as you want. When you have many layers, a meaningful name will make your task easier in time of further modifications.
Create Duplicate & Modify
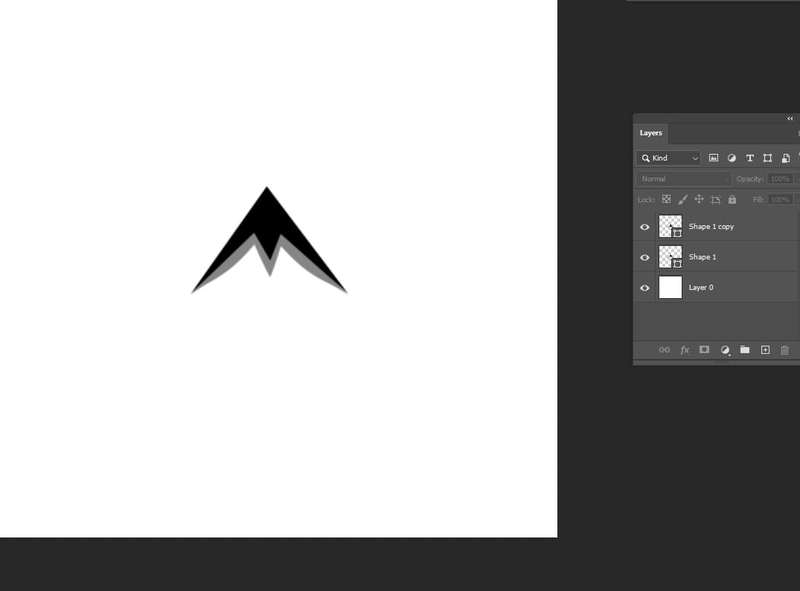
You can duplicate the first layer by selecting the layer & right-click on it & choose Duplicate Layer or use the shortcut “cmd +J”. A new duplicate layer will be created. From the toolbar choose the direct selection tool or enter “A” to select it. Now select the topmost arrow-head & drag down a few grides by pressing shift to keep lock the y-axis.
Use Gradient
In a logo color is the most important thing to grab the customer’s attention. You should avoid the color that burns the eyes. You should pick a cool color that is effective to catch the attention. The gradient is a fantastic way to play with color. Here a mixture of colors gives an amazing output.
Choose the gradient tool from the toolbar & from the Options bar you can mix your own favorite color code to customize gradient color. From the Gradient menu click on the bottom Icon & select New Gradient & now you can set your own color.
Here I set light & dark blue. Then use this gradient in both layers but apply rotation to bring an opposite pattern.
Group & Duplicate
You just select one layer & pressing shift select the other layers & after selecting both layers click on the create a new group button. Or you can just enter cmd +G to make a group of multiple layers. It will make your work organize & clear. You can now move & modify both layers together.

I mentioned before how to duplicate the layer. Using the same process creates a duplicate of the group. Press cmd + T to use the Free transform feature to rotate the new duplicate group 90-degrees & push the shift to rotate more 50 degrees. Use the Move tool to move the second group until it derives its actual shape.
Layer Transform
Press each layer up or down one-grid box from the center point. You can do it by Shift + Cursor key.
Repeat

Here follow the above mentioned Group the layer together & Make a duplicate of it. Using the free transform feature rotates the group by 90 degrees. The new shape should be placed such as a cross-connection shape.
Draw A Circle Shape
From the toolbar select the shape tools & now select the Eclipse tool. You can draw a circle by eclipse tool by pressing shift. Now click on the center point & draw the circle like the below images.\
Draw A Rectangular Shape
Now from the shape tool, select the Rectangle tool & in the middle point of the circle draw a Rectangle. Pick the color as white from the color plate. You should make the Rectangle large so that you can attach a company name.
For further modification, you can select Layer> Combine Shapes to deduct the rectangle. But here as It’s a basic logo we don’t do it.
Attach Text
From the toolbar select the Text tool & now from the Options Bar set your favorite font & font style. Now using the text tool make a text box in the Rectangle & start writing into it.
Select center text from the Options bar. After that select Layer > Align to centralize the text accurately.
Font Guideline
There are thousands of free fonts with various styles. You can pick the font that matches your design concepts or vision. There are some exclusive features that you need to buy for use. So, it’s up to your choice. Besides, a logo is an important part of your company so you invest a little to make it more attractive.
You can easily change the text color from the Options Bar. Modify the color & try to find out the best matching color with your logo.
Adjustments
This is an essential step to make your logo standard & efficient. You need to adjust the spacing between letters & ensure the word’s readability perfectly. To do this adjustments select the fonts & push alt+left/ alt+ right. It is also known as text kerning. It helps you to adjust the horizontal spacing.
Final Task in Logo Design
In this step, the aim is to try to enhance the beauty of your logo. Try to add a little style to make it exclusive. Here I use two line tools top & below the text & apply gradient color. Besides, I attach a shadow, reflection, apply layer masks to bring the fade vibe.
When you feel efficiency is derived, save the image in Photoshop. The formate you can choose according to your needs. If you use it on the web choose RGB mode & save in JPG but for printing choose the CMYK mode. Don’t forget to save the original PSD file to do further modifications.
This a complete Photoshop logo design guideline on how to make a logo. If you follow all the steps crucially you can make your own logo. Here, I share some secret tips & strategies that need to follow when you are designing a logo. I hope my tips will engulf your skill & help you to be a pro-logo designer.
In this competitive field, there’s no alternative to efficiency & perfection. In logo designing as many practices, you have done that much efficiency you can achieve. Practices are the key to be a successful logo designer. So, let’s start to do your logo design in Photoshop right now.
You may also read: