Have you ever wanted to make your photos look better by resizing them? Photoshop offers various methods to resize images, whether for an eCommerce website, social media profile picture, or a website banner.
But the million-dollar question is, how can one do that effortlessly, quickly, and accurately?
This article will discuss the methods for resizing images using Photoshop. We will cover both quick and easy ways and more advanced techniques that provide greater control over output sizes.
So if you are ready to know how to resize photos in Photoshop, let’s get started!
The ability to resize an image or batch resize is one of the most useful ones in Photoshop. No matter how seasoned, Photoshop users can benefit from learning how to resize images.
You’ll eventually need to enlarge or reduce the size of an image in Photoshop, whether it’s for your purposes or those of a client.
The image editing software Photoshop has some resizing methods where you can reduce a picture’s size without sacrificing clarity or resolution.
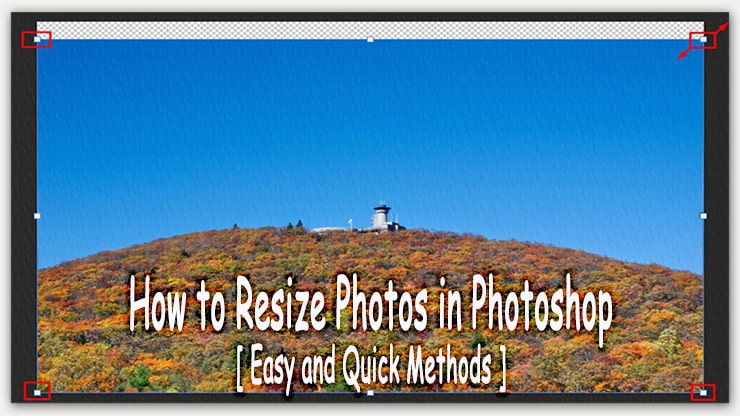
In this guide, you’ll learn How to Resize Photos in Photoshop.
Resize Photos in Photoshop
Resizing photos in Photoshop can be beneficial when working on digital art projects or creating visuals for a website, blog post, or print. Image resizing in Photoshop allows you to change the size of pixels, meaning that your photo will remain clear and high-definition even when you scaling images up or down.
Adjusting the size while maintaining the quality allows you to bring multiple images into focus and adapt them as needed without losing any details. Furthermore, Photoshop can easily add filters and other effects to enhance the look of your photo without compromising on resolution.
How to Resize Photos in Photoshop
Resizing photos in Photoshop is a simple and efficient process. is a great way to save disk space, reduce the load time of webpages, and create images with more appropriate pixel dimensions for sharing.
You will know here five step-by-step methods for Resizing photos in Photoshop: using image size adjustment, Smart Objects, Drag & Drop, By Dragging, or Crop tool. You can adjust the resolution or aspect ratio of your selection.
It is a quick and easy way to resize photos directly in Photoshop to get higher-quality images with minimal effort.
Learning how to resize a photo in Photoshop is helpful, whether you need to scale down a layer to make it fit a specific space or up to make a shot fit a frame.
However, some of these methods will result in a picture that is even worse than the original.
The procedures indicated here will guarantee that the final product has a better resolution than the original.
— Method 01 —
How to Resize Photos Using Image Size Adjustment
You can modify a picture’s proportions and quality using the Image size adjustment. This strategy is excellent if you need to match very particular proportions.
When printing an image, you can change the size immediately to achieve the most outstanding results. The procedure is as follows:
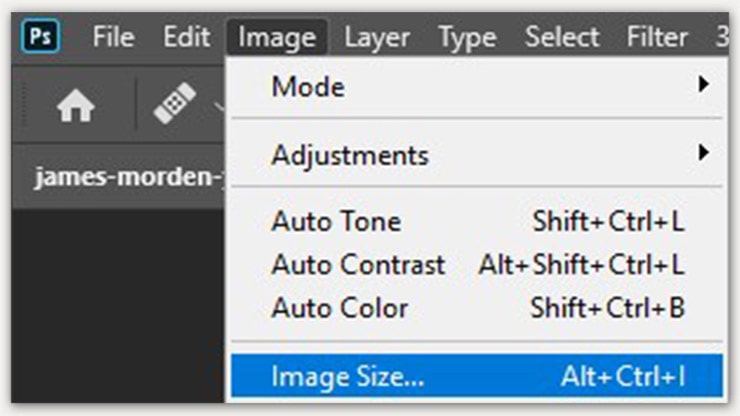
Step 1: Select the Image Size in Adobe Photoshop
First, Open Photoshop on your device. Select the file from the top menu bar; many options are below.
You have to click on Open, and you have to select your particular image.
Again, select an image from the top menu bar, and you will see many options as before. You have to select the photo size.
On the other hand, you can apply keyboard shortcuts for this option. For windows, use Alt+Ctrl+I, and for Mac, Option+Command+I.
Step 2: Adjust Image Dimensions
A new dialog box will pop up. From here, you can see your image’s current dimension.
You can adjust your image measurement units by clicking the Dimensions drop-down box.
You don’t need to worry if you are confused or unaware of picture sizes. Just click the below option Fit To. This will guide you in choosing your desired sizes by showing some recommended dimensions.
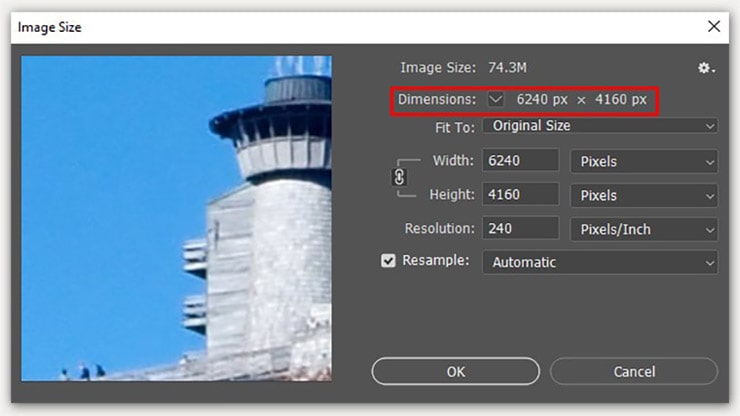
If you know your photo size, adjust the Weight & Height option. You can change your size by clicking the boxes beside these options.

Usually, these two are linked together with a chain link option. You can uncheck the option if you want to edit it independently.
Step 3: Adjust Image Resolution
Now that you’ve increased the size of your picture, you can alter its resolution. More said, a more extraordinary resolution results in much more pixels, yielding a higher quality and crisper-looking shot.
There are two different units for resolution. One is PPI (Parts Per Inch), and the other is PPC (Parts Per Centimeter). Just choose wisely as per your image demands.
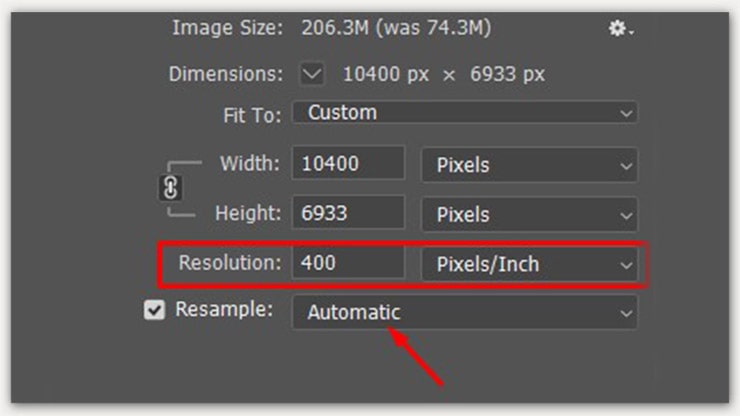
To modify the resolution, type the amount in the box. But remember, the Resample option is checked, and it is selected to Automatic.
Step 4: Finalize Resizing Photos
When satisfied with the results, click the OK button at the bottom of the Image Size dialogue box.
Photoshop’s effect application time might range from instantaneous to several minutes, depending on the extent of your expansions.
When done, your image will enlarge to the specified dimensions and resolution. If you need to reduce an image’s size without compromising quality, this is one of the fastest ways to accomplish this.
— Method 02 —
Resize Photos Using Smart Objects
The old technique only worked within its project and only increased one layer. How do you resize a layer that can be flexibly dragged and dropped among Photoshop files?
This is where the use of “smart objects” becomes relevant.
With Photoshop’s smart objects, you can resize layers without compromising the quality of the image. You never modify the image; instead, you work with a “container” that holds your image.
You can safely scale up and down a layer an unlimited number of times without ever compromising on quality. As a result of using raster layers, the image quality would suffer significantly.
In this article, we’ll discuss smart objects in further detail.
Okay, let’s go forward and figure out how to use smart objects to make a layer bigger.
Step 1: Convert Your Image to Smart Object
You have to convert your Image to Smart Object. Now, select the image layer. Then click the right side of your mouse.
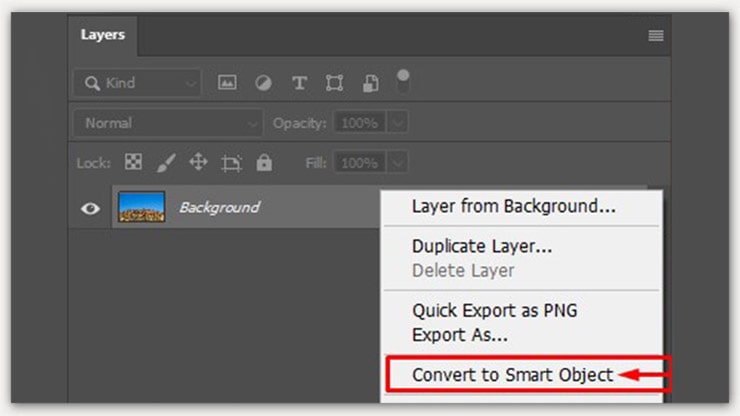
You will see many options available there. Select the Convert to Smart Object option. You will see an icon in your image layer thumbnail to ensure the smart object.
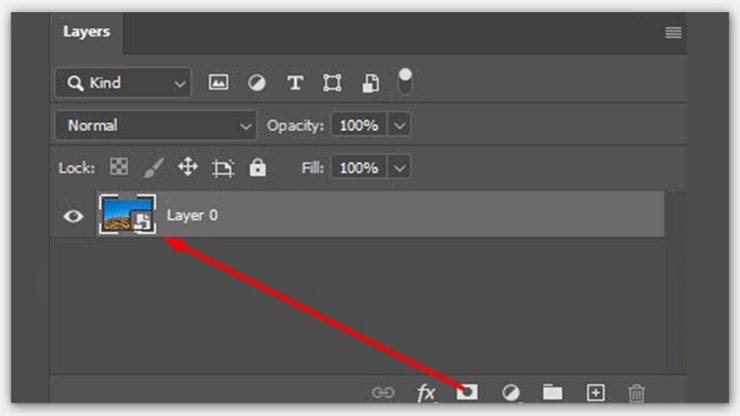
Step 2: Resize Your Images
Now, Double click on the layer thumbnail. A new window will appear, and you can see your image here.
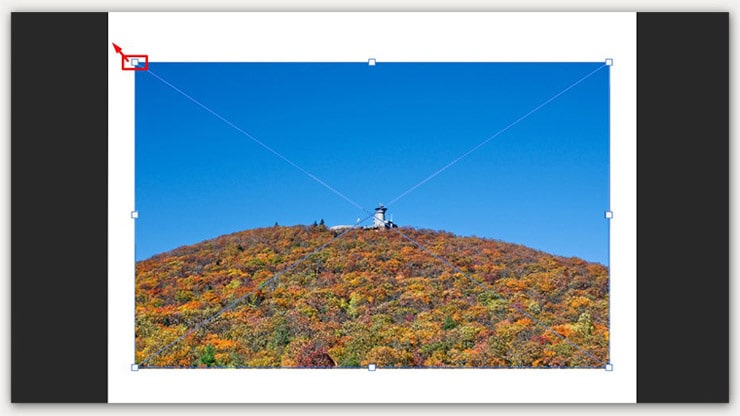
To transform your image, press Ctrl+T for PC and Command+T for Mac. You will see a resize box around your image.
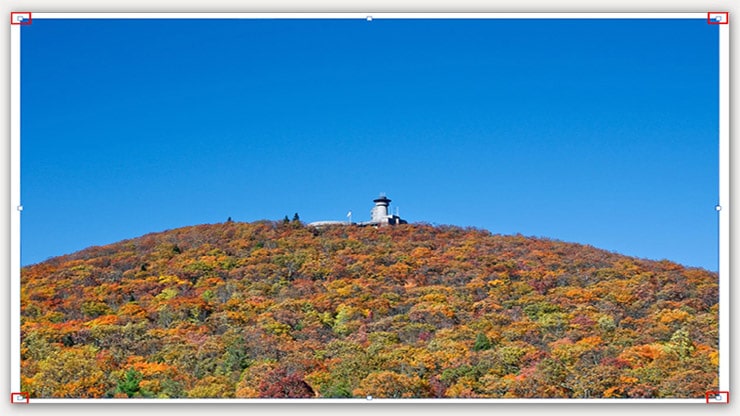
There are some square boxes in the corners and middle. You have to drag your mouse to resize your image.
If you want to move the image, you can drag this image there. But remember, this transform tool won’t be able to increase the resolution. However, there are also some adjustable tools for images.
Using smart objects is an excellent option for adjusting the size of the image to fit a specific canvas. Additionally, it ensures the best possible image quality is maintained regardless of how large the layer is scaled.
— Method 03 —
How to Resize an Image using Drag & Drop
You may also use the drag-and-drop method to resize an image without compromising quality.
Drag-and-drop file transfer greatly enhances Photoshop’s layer resizing and moving capabilities.
Once you save your edits, the layer becomes a smart object while retaining its original quality. This is it if you’re looking for a more straightforward approach to resizing photos and layers.
Step 1: Choose an Image
Find your desired image. Keep Photoshop open in the background.

Step 2: Open the Image in Photoshop
Please select the image and drag it into Photoshop. It will automatically open the image in your canvas.

Step 3: Resize the Image
Now, it’s time to image resize. As before, you will see the transform box again. Just drag it as you wish.
After that, click Enter, or click on the tick icon from the option bar.
You can notice that your image has already turned into the Smart Object. If you want to resize it again, you can do it whenever you want to.
You can also use the Move Tool to fix the position of the image.
— Method 04 —
Resize Images By Dragging
Step 1: Open the Image in Photoshop
As before, open an image or drag it to Photoshop. You can get the transform box by pressing Ctrl+T (PC) or Command+T(Mac).

Step 2: Resize an Image Without Losing Quality
When dragging your image from the corner, you may be unable to retain its size.
If you want to keep its size like the original, press the Shift key and drag it like before. Doing this will maintain the quality of images.
— Method 05 —
How to Resize Photos Using Crop Tool
By its nature, the Crop tool destroys the original image when used to resize it. However, the image’s quality may suffer due to the resizing.
After an image is cropped, the removed portions are no longer available.
It is recommended to utilize the crop tool to minimize the width or height of an image by cutting off unwanted sections.
Step 1: Find Crop Tool
In the toolbar, you can see the crop tool. If you can’t find it, use the keyboard shortcut C.

Step 2: Finalize Resizing
A new kind of box will appear after selecting the tool. It looks different than the transform tool. Drag the corners. The image inside the box is brighter than the outer part.
The insider part will remain, and the outside part will be cut off. So, drag it like that.
It will keep the quality of your image the same. When you are done cropping the image, just hit Enter for windows and Return for Mac.
How to Resize Canvas in Photoshop?
It’s time to discuss your canvas, and now you have learned how to resize photos in Photoshop without sacrificing quality.
Instead of a single layer, the entire canvas may need to be resized in some situations. In a fortunate turn of events, this is a breeze to arrange.
Step 1: Open Canvas
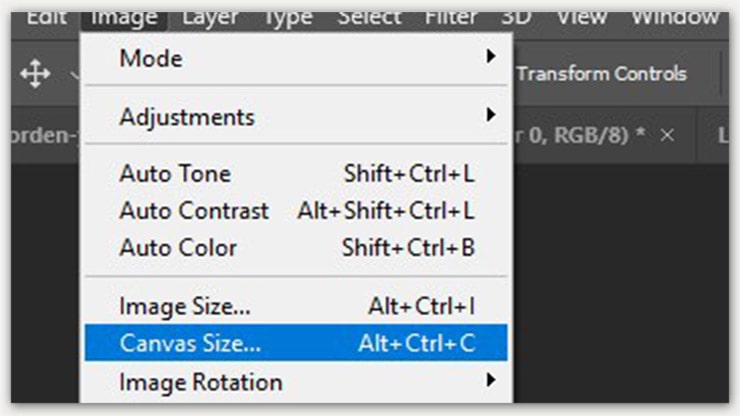
Take a photo on your canvas; select an image from the top menu bar. You can see the Canvas Size option there.
Step 2: Adjust the Dimension Box
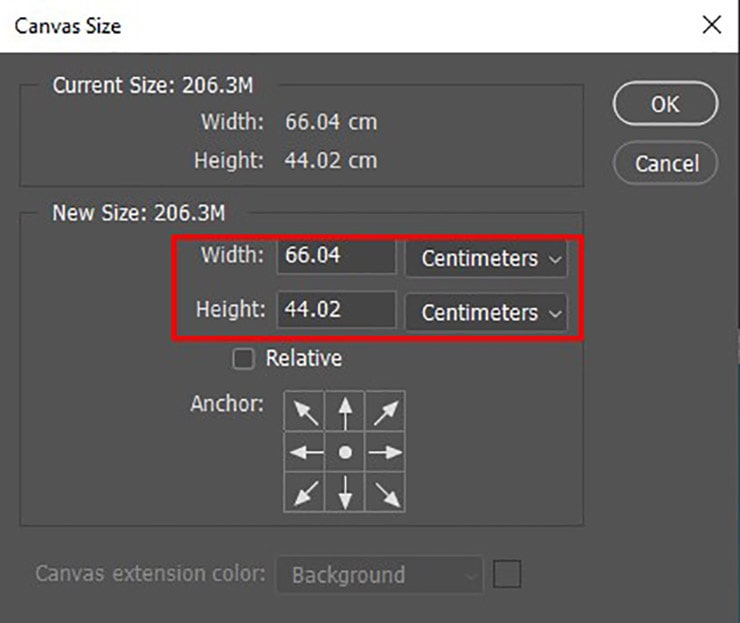
A new dialogue box will show up. Just like before, you can customize the weight and height. You can change the units as well. So just put the amount in the dimension box.
Step 3: Resize Canvas
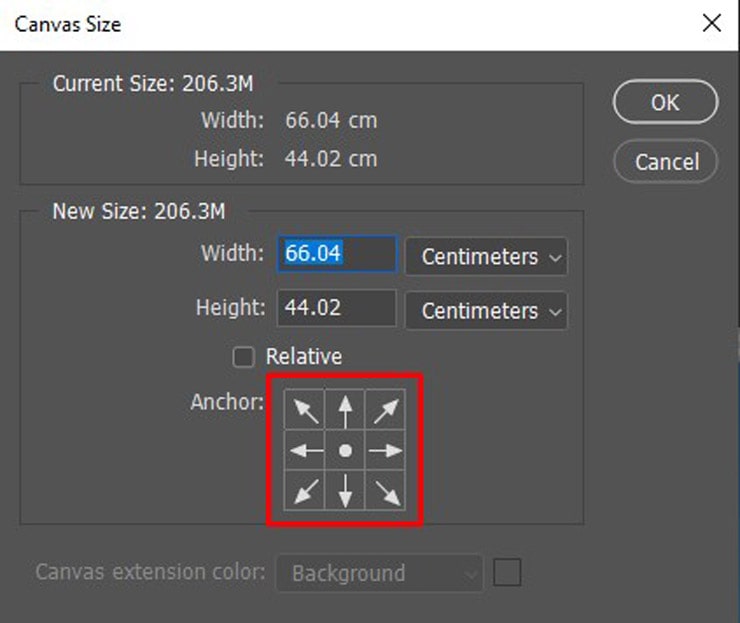
The next option is Anchor. You can enlarge your canvas in any direction. Manually it’s set to the middle direction. That means your canvas is equally spread on every side.
If you keep the center below, your canvas will enlarge from the upside. Just like that, you can take this in any direction.
Though, this option is used sparingly. But it can be helpful sometimes.
FAQs
Yes, you can resize a JPEG image in Photoshop. Photoshop supports different kinds of image files. So, the JPEG file is one of them.
Yes, there is a resize tool available in Photoshop. You can apply it by pressing Ctrl+T for windows and Command+T for Mac.
The fastest way to resize an image is by applying the Transform Tool.
You can also choose the photo Size option to adjust image dimensions. It will keep the resolution better and also does the job quickly.
Final Words
Several methods for reducing the size of an image in Photoshop have been covered. In addition, you are aware of the effort required to attain optimum outcomes.
We used multiple Photoshop techniques above to demonstrate how to resize an image without distorting it.
As can be seen, turning a layer into a smart object also allows you to use it in several projects, and yet also helps maintain its quality. Resizing an image in Photoshop is now well within your grasp.
Now, you know How to Resize Photos in Photoshop. Thanks for reading, and I hope you find this helpful tutorial in learning when and how to use Photoshop’s resizing features.
Happy Editing!
You may read: