Cut Out images in Photoshop typically involve removing the background from an object or subject in a photo and placing them on a transparent background or a different background.
Whether you are a professional photographer, background remover, or simply someone who enjoys photo editing as a hobby, mastering photo cut-out in Photoshop can greatly affect your editing images.
Cut Out Image in Photoshop is an essential image editing skill. If you use any photo editor, you will find it easy. However, doing it right like a professional requires patience and practice.
In this article, I will explain the step-by-step process of cutting out images in Photoshop. So, let’s start…
What is Cut Out Image In Photoshop?
Cut Out Image in Photoshop refers to isolating an image or its specific part or area from its background in Adobe Photoshop. It is usually done using various tools, like the pen tool, lasso tool, quick selection tool, or magic wand tool.
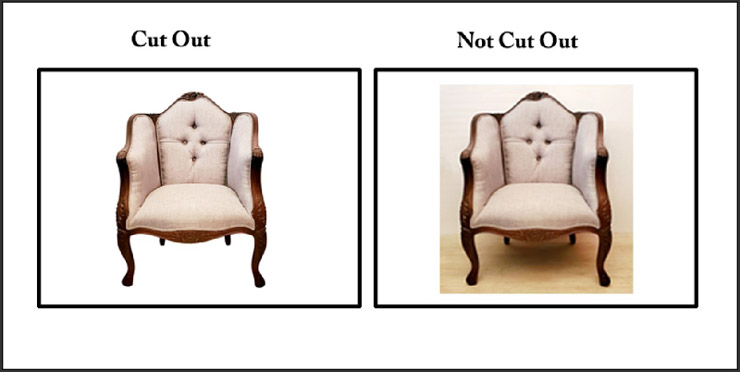
The ultimate goal is to remove an object or element from an image or place it against a new backdrop. The process of ‘cutting out’ an image includes careful selection around the edges of the intended object, creating a path, or making a layer mask to separate it from its original background.
With the right skills, one can make the cutout look as natural as possible to ensure the final image maintains a professional appearance.
Why Image Cutout is Necessary?
While browsing E-commerce giant Amazon or Shopify, you see eye-grabbing product photos. It must make you tempted to buy the products. Besides, when you see celebrity pictures in a newspaper, you can’t look at another heading quickly. Here, the trick of grabbing your eye is a transparent solid background. It makes the subject appealing & focusing.
Suppose the product photo or celebrity image contains a distracting background or unwanted objects. That makes the customer or viewers distracted from the original subject. An appropriate background is key to grabbing focus on the main subject.
It is time-consuming & costly to do a photoshoot in an ideal background. Cutting out images is the best solution to remove backgrounds & replace them with a solid black-white one. It helps to increase your sales & brings more audiences.
Cutout Photos help to focus on model styles & lifestyles. It will be easy to make the advertisement more memorable & attractive to the viewers.
A product image with unwanted objects can create a wrong impression for your shops. But cut out photos help to make your image appealing, clean & professional. When you organize your website with this type of high-quality image, it increases your traffic.
Yes, some exceptional products don’t require cut-out images. Such as Wallpaper tiles will give the best results in lifestyle shots.
How To Cut Out Images in Photoshop – Step By Step Guide
A valuable shot can turn into a waste due to a distracting background image. If you are unsatisfied with the image background, you need to cut out objects from the background. Then, place it onto a clean, transparent background to attract the audience and cut out the image.
E-commerce owners, photographers, models & celebrities suffer significantly from a distracting background. Re-arranging photoshoots is impossible because it needs both time & money.
Suppose you are looking for how to cut out an image in Photoshop from the environment without any pixel loss. Cutting out images is challenging, depending on their backgrounds, because you risk reducing your image quality if you try it incorrectly.
In this article, you will find some significant cutout image methods. It will help you to solve your problem. You can choose the suitable process based on your requirements.
I will share three easy & quick cut-out photo techniques that help to protect your image quality. The most critical part of removing any object is hair & fur. I am sharing the Quick Select with the masking method to do this critical task perfectly.
Suppose you are a wild photographer. Cutting trees is a challenging task. It contains lots of branches and lines that are difficult to select. But follow my color range strategy; you can do it without expertise.
However, if you have more complicated images & chase for perfection, then follow the best and most advanced Pen Tool Method.
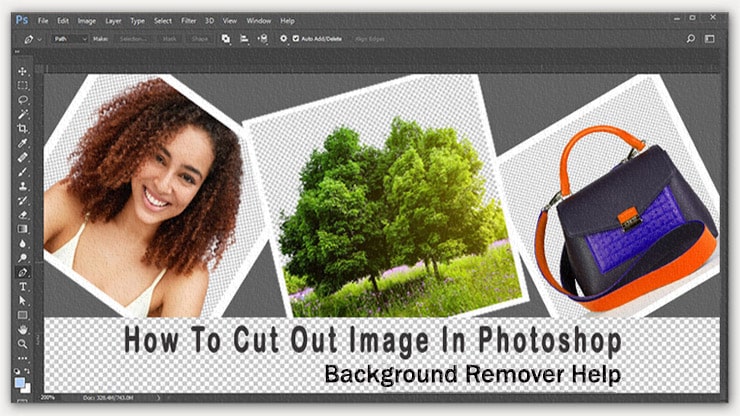
Photoshop is the best tool to derive excellent results. Here, I am also showing you step-by-step cut-out image methods in Photoshop. Let’s learn the process & make your masterpiece.
( Method 1 )
Cutout Images In Photoshop Using the Pen Tool
The pen tool is outstanding for making advanced cutouts & complex selections. If you know how to use it, you can derive something exclusive. Our pen tool is the best option to cut out images perfectly.
But using a pen tool needs a bit of experience & skill. Without that, you can’t perform this method. So, give some effort to learn how to use a pen tool. If you already know how to use the pen tool, skip the steps below.
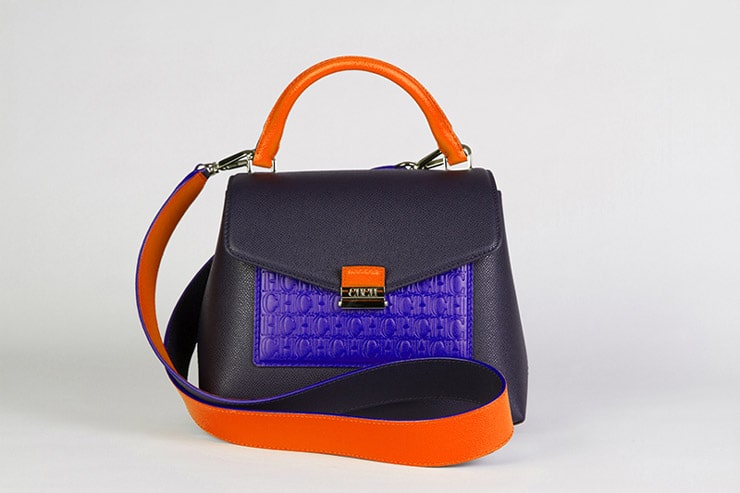
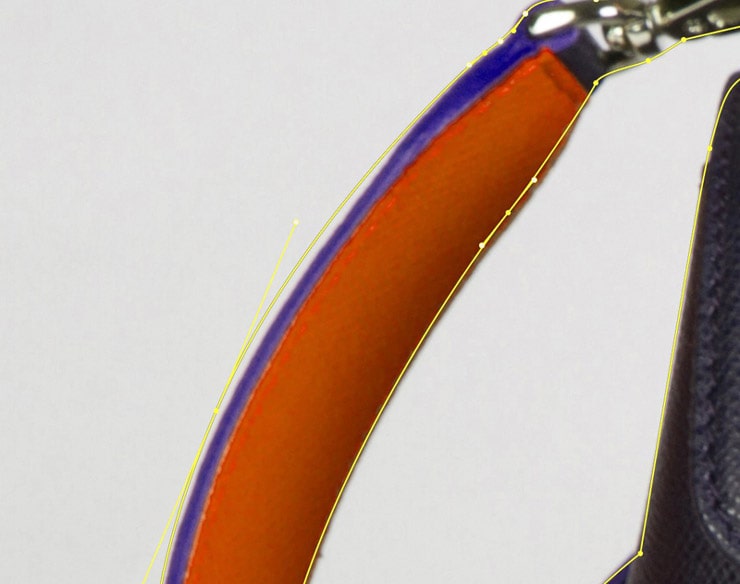
In this tutorial, I choose a bag image. I will cut out the bag from the background.
Make Primary Clipping Path
From the left toolbar, choose the pen tool. Now check the top option that selects the path instead of the shape.
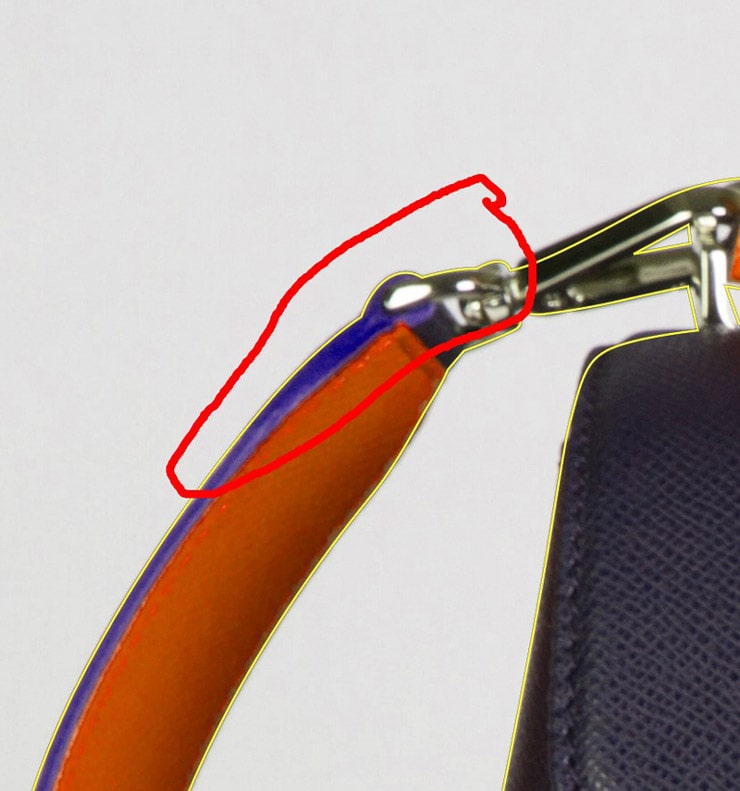
Choose any particular area where you want to begin & click on it. Then, gradually drag in the bag’s direction to create the path. After selecting the first curve in your subject, click again & drag it.
As a result, you will find an elastic line between these 2 points. You can drag close or away from the points to see the changes & you can also change the direction. As it’s a primary path, you don’t need a perfect selection. You can draw a rough path that entirely covers the objects.
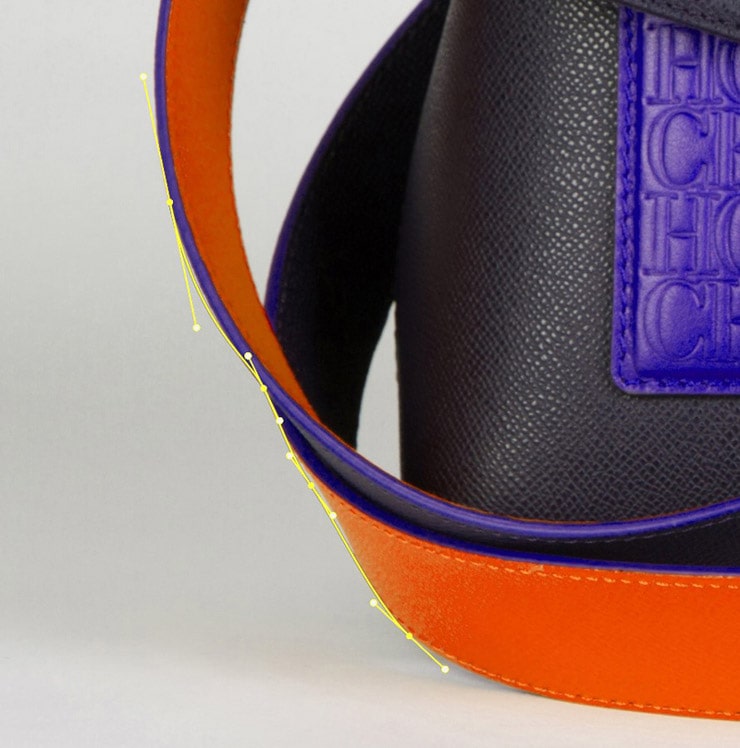
When creating a path in the right belt, I include ground so I don’t need any additional selection for the bottom area.
Do you need help with how to finish it? Take the cursor over the starting point to finish the task. While you hover, you will find a little circle. Just select that point to finish the path. You should try to make the path with the lowest points.

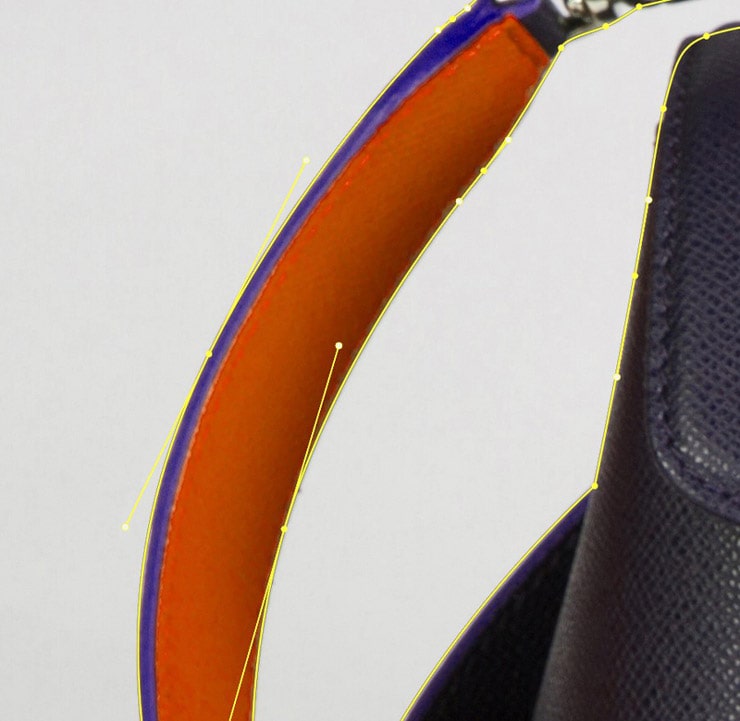
Refine The Path
A little strategy can give something greater. I prefer to do path perfection into two phases. However, some people try to achieve it in the first step. My strategy will give you better output.
Now, from the toolbar, choose the path selection tool & then select the Direct selection tool. It’s easy to activate it with a random click on a point.
Firstly, zoom in closely, then drag the points crucially into the proper position. Then, rotate the handlebars to modify the curve angles. Slide & pull the endpoints to reposition the slope of the curve.
As a beginner, you may find it challenging. But after a bit of practice, you can easily adjust the path.
Pulling one end side of the curve & holding down the Alt option until you are completed dragging is better.
Add Points
Often, it is tough to adjust the selection by dragging a single point if it contains multiple curves. In this mirror area, we drag the endpoint to adjust the curve but cannot derive the proper selection.
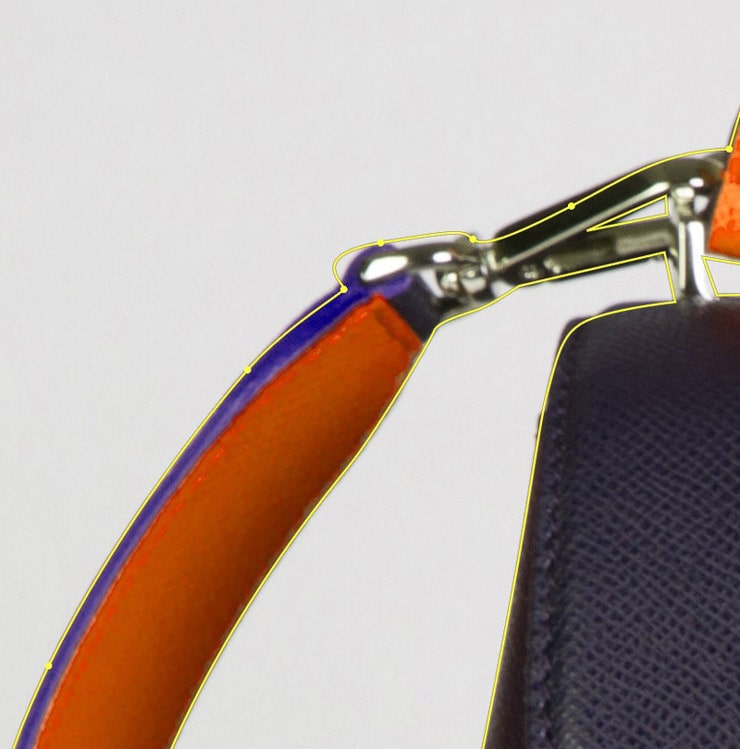
In this type of scenario, we need to add an extra point. Pick the pen tool & select the Add anchor point tool to add a point.
Just click on the line where you want to add the point. You can find a few of the latest points on the line.
Now, you may use the direct selection tool or the pen tool to adjust the path.
Just adjust the new points to create the perfect curve. Drag the handlebar to adjust it. Gradually pull & drag to refine the path.
If you need clarification on this method, get help from a professional Clipping Path service provider.
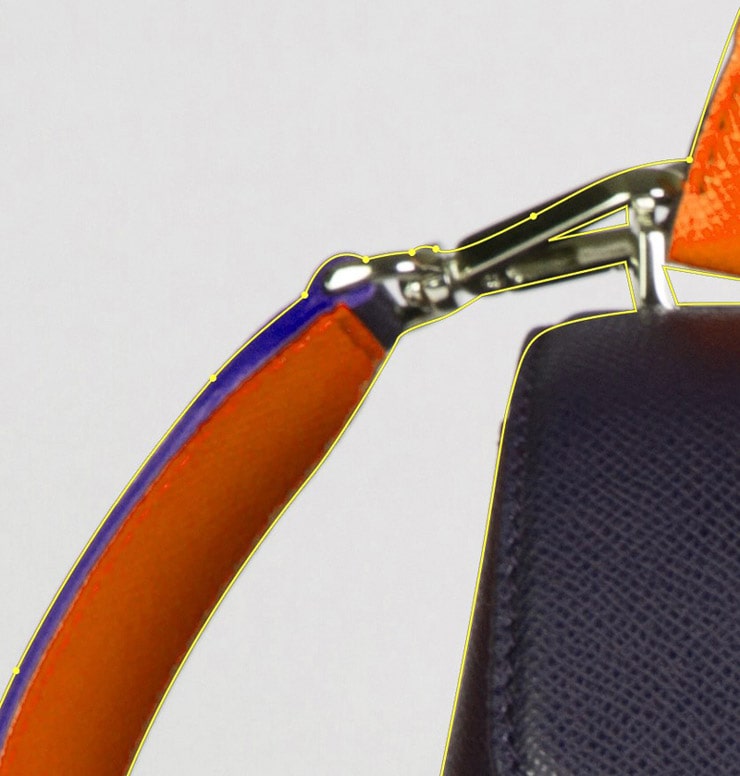
Finish the Path

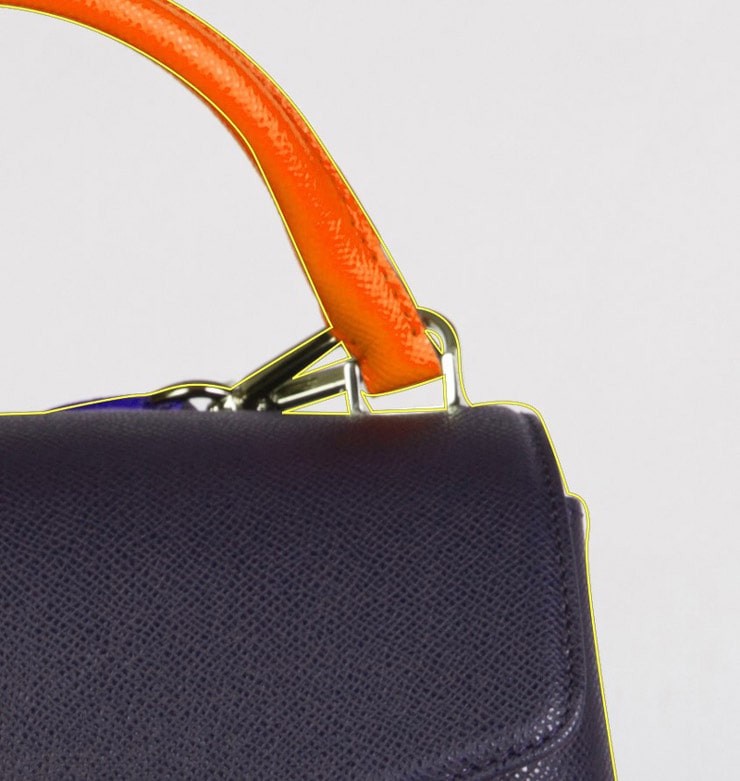
You are close to the end once you are done with the bag’s path. Now, choose the outside point to cover the Background.
You need to repeat dragging until you have achieved the below path.
Convert Path into Selection
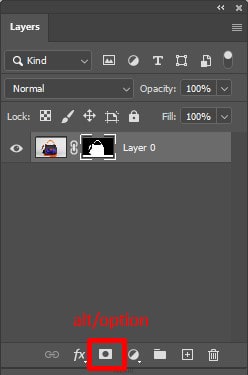
We re-name our path as a Work path. Now convert it into a selection. Enter Cmd/Ctrl & choose the work path in the path. As a result, you will see the upper outside part of the bags.

Now you need to invert it, so enter the Alt/option to mask.
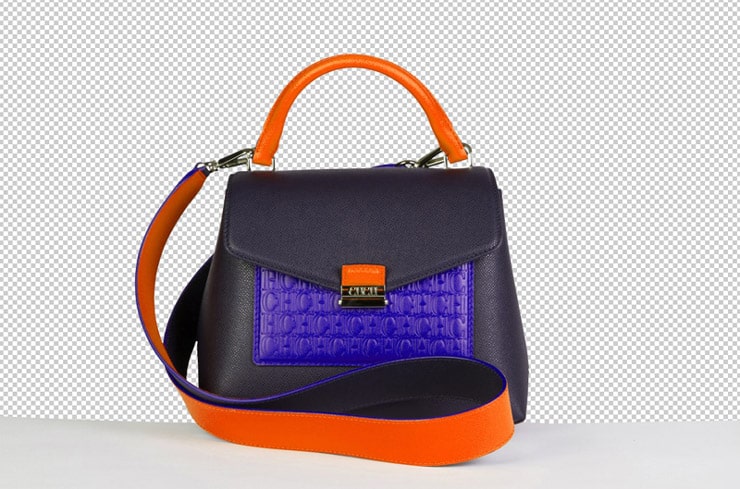
Now, you can only find the cutout objects with sharp, clean edges without pixel loss.
( Method 2 )
Photo Cut Out Using Quick Selection Tool
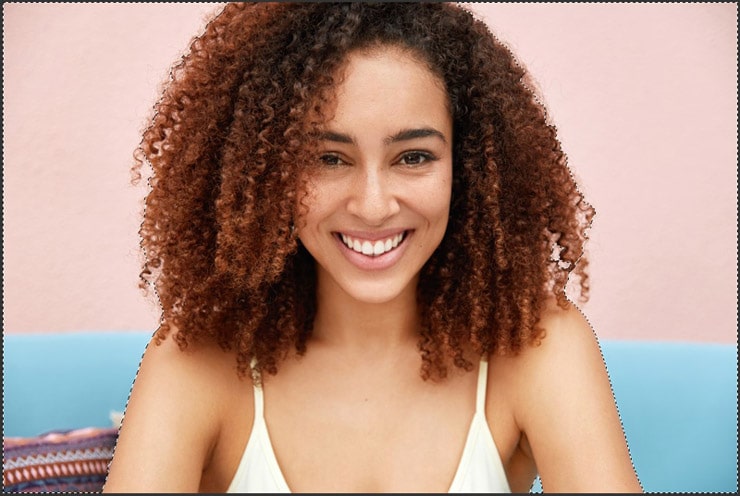
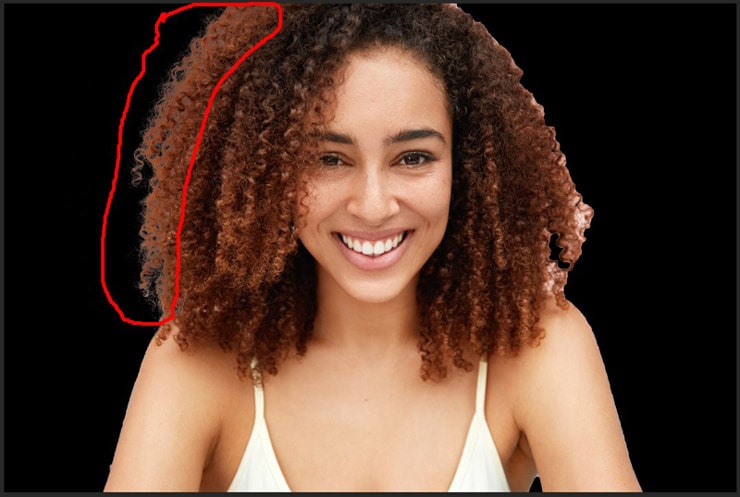
To apply this method, you can choose any photo. If your pictures contain hair & fur, then it is the best way to remove the background from photos. I am taking the below model picture with curly hair.
Usually, cutting out a curly hair picture is more complicated. So, I am working with a complex image to explain to you every detail.
Open Image

First, open your Photoshop CC 2022. Please remember this method is only applicable to the Photoshop CC version. Then select File-Open -choose an image.
Make Selection
Now check the left toolbar box & pick the quick selection tool to make your selection. Here, most people need help to select the subject. The subject contains many lines, small details, and hair that is impossible to select without pixel loss.
Instead of selecting the subject, you should be strategic. Try to select the background & you will be glad to know It’s a 1-minute task. However, if your picture contains a complex background with an easy subject, and vice versa, the rule is simple: select the easiest one.
To make a selection, drag your quick selection tool over the particular area. You may be afraid if you come out of the area. Don’t worry. Enter Alt/Option to deselect the extra space. It helps to make an accurate selection.
Inverse Selection
After completing the selection, it’s time to inverse the selection. As a result, you will be able to select your complex subject. From the top Option Bar, click Select-Inverse, or to shortcut, you can enter Cmd/Ctrl Shift+ I. I know the result will surprise you. Isn’t it?
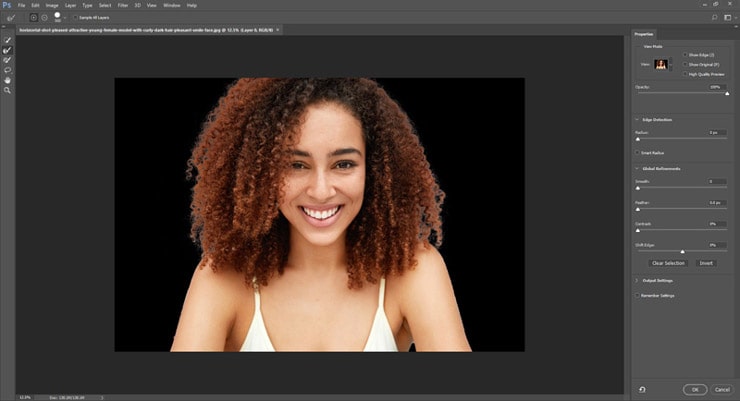
Refine Selection
Now, it’s time to polish your selection to avoid pixel loss. You need to give attention & dedication in this step to cut out the subject entirely. Choose Select-> Mask from the menu bar, and it will open a mask workspace window.
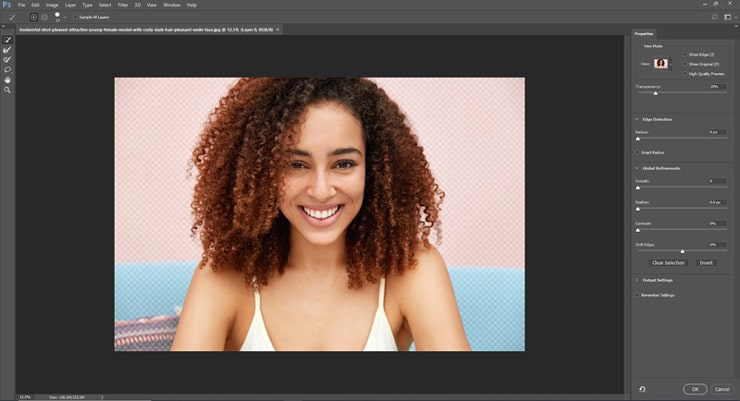
Now, increase the underneath transparency to make the background layer invisible. It is actually for checking your subject selection accuracy.
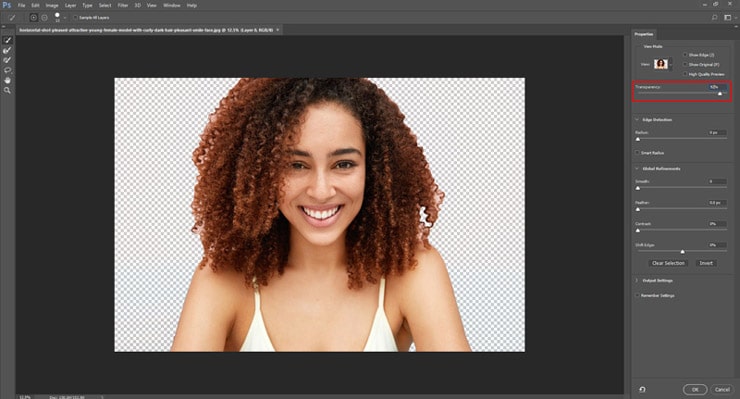
Then, modify the View option based on the best output. You can switch to white or black depending on the edge accuracy.

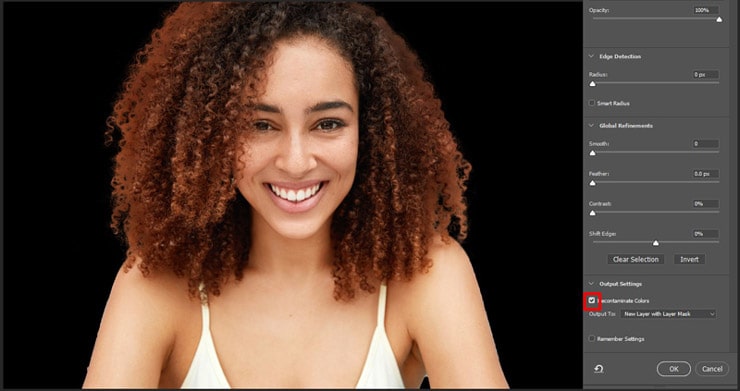
Choose Refine Brush
From the left toolbar, choose a refined brush. Now, check your picture carefully to find out the flyaway hair. Find out all the hair edges & endpoints to paint over the area of the flyaway hair.
It helps to differentiate the hair & background in Photoshop. While refining the edges, you must impress with the elegant selection & the selection turns into the best one.
The best part is I will share a secret weapon to make your selection outstanding. Turn on the Decontaminate colors. It helps to get rid of color fringing. To save the final output, choose New layer with a layer mask & select OK.
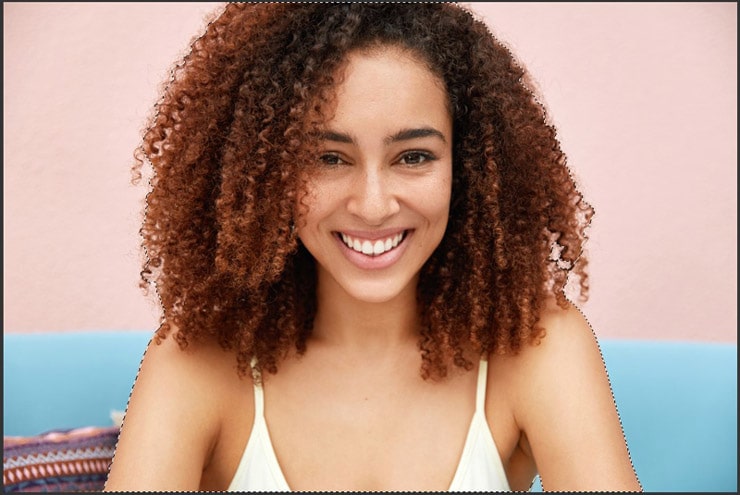
Final Output
Here is our final cut-out image in Photoshop. I guess you noticed that cutting out the background won’t reduce its image quality. Instead, It becomes attractive.
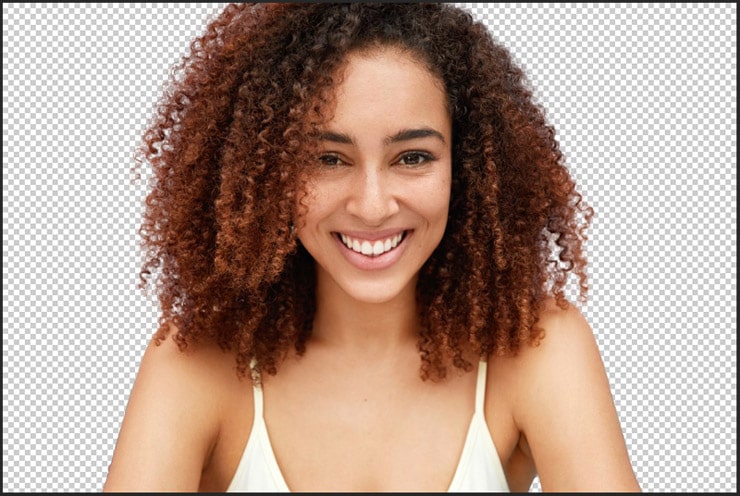
Moreover, you will find a layer mask on the final layer. It is basically for further correction or refining the cutout if you are still not satisfied with the result.
( Method 3 )
Cut Out Pictures In Photoshop using the Color Range Strategy
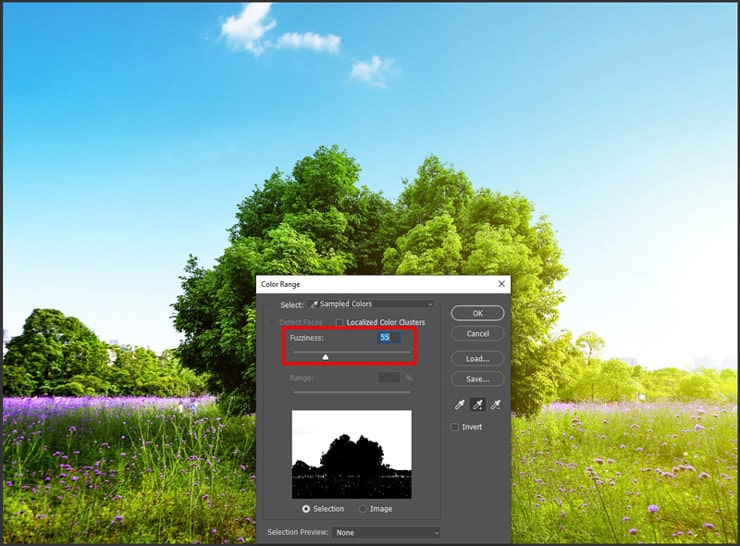
This method will give you the best result if you want to cut trees with transparent objects like glass, smoke, or liquid. We take an image with big trees to apply this method.
For example, you have a highly complex subject that contains multiple holes with a solid color background. To cut out complex subjects, this method is unbeatable.
Open Image

First, open your photoshop. Fortunately, this method is workable for any version of Photoshop. Then choose File-> Open -> Select Image.
Make Selection
You need to apply the color range to do the selection in Photoshop.
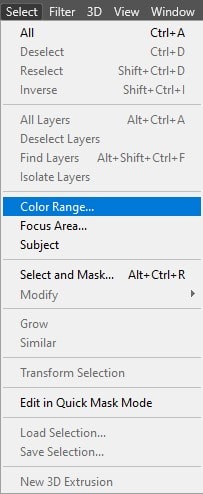
Now click Select-> Color Range.
It will appear in a new popup window on the screen.
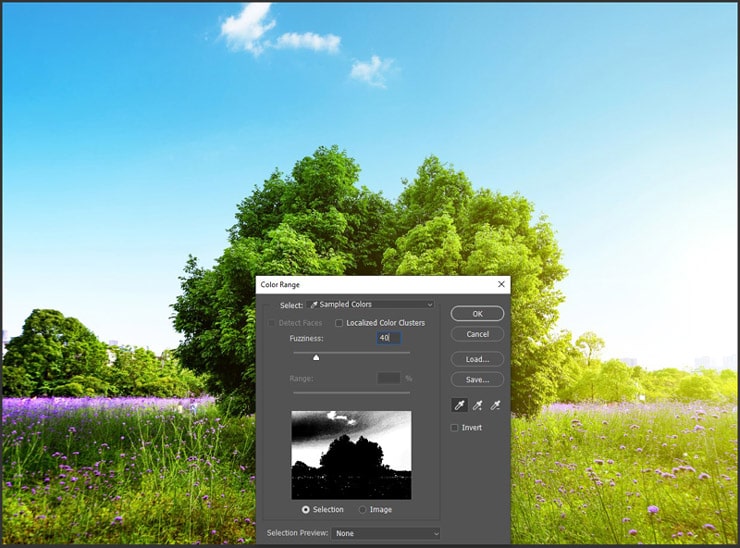
Use the Eyedropper Tool
From the left toolbar, pick the eyedropper tool.
Now, choose the standard color from the popup window from the image close to the subject. For the below image, I chose sky blue. You can notice some white space in the selection area in the picture.
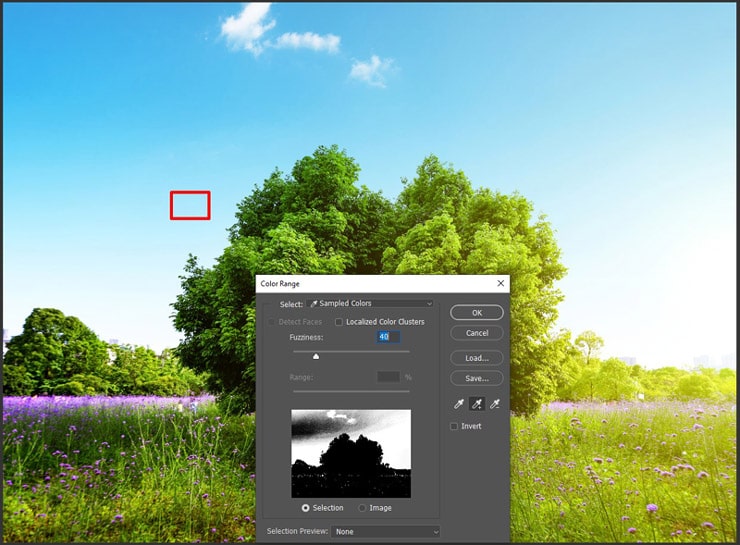
Refine Selection
Now, it’s time to turn your selection accurate to derive perfection. You need to polish the selection edges to maintain image quality.
Choose the eyedropper tool from the toolbar. Then, drag with the eyedropper crosswise the background to affix to the original selection. In this tutorial, I drag to the right side of the tree to add all blue & white to my selection.

There is a chance of missing tiny bits, so I repeat the dragging on the white area. Now, check the popup window. You will see a black & white combination. It indicates you are close to the final output.
Fix Fuzziness
You need to adjust the fuzziness slider to make your selection more accurate. It will help to make your subject more appealing to a white background.
Adjust the Fuzziness slider & select OK.
Now, we have selected the background.
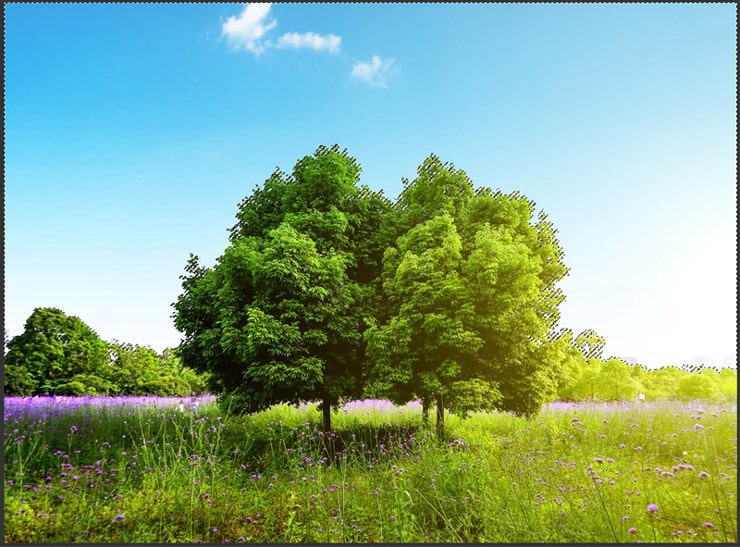
Mask the Selection
You are already done with the selection for the background. Now, you must cut out the selection to finish your task. First, we must invert the selection area to get our target output.
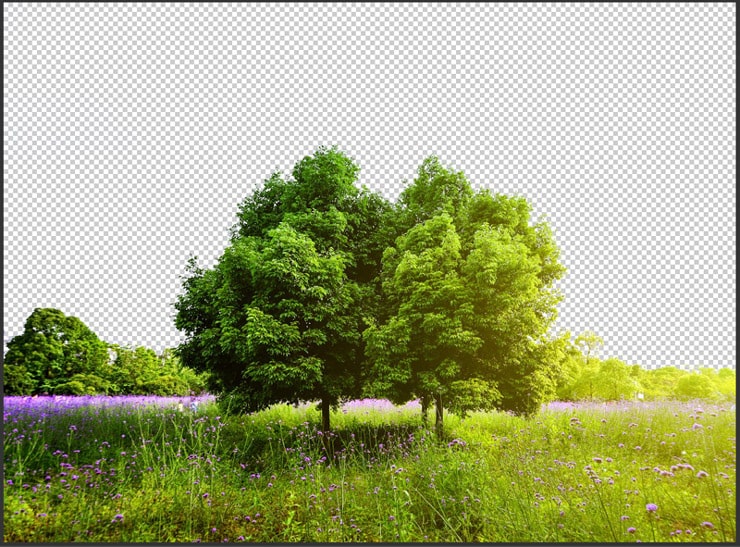
We need to hide the background & make the subject visible. To do so, press the Alt/Option key & choose a new layer mask.
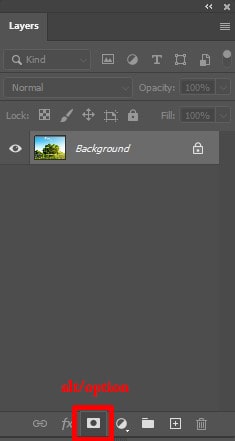
Now select the layer mask icon. You will find a clear, nice subject image without a distracting background.
FAQs
Cut Out Image is a guide that helps you learn how to cut out an image in Photoshop and provides assistance with background removal.
Yes, Photoshop is a powerful tool for editing photos. You can enhance the colors, adjust the lighting, remove imperfections, add text or logos, and make your product images look more professional.
You can easily cut out an image in Photoshop by using selection tools like the Magic Wand, Quick Selection, or the Pen tool. These tools help you select the desired area, and then you can change the background or apply any edits as needed.
Yes, you can find templates for image cutouts online. These templates provide pre-designed shapes or outlines that you can use to cut out specific objects or subjects from your images quickly.
Final Thought
Cutting out images in Photoshop sometimes requires lots of time & expert hands to draw the right path. Here, I am sharing easy 3 methods for different types of images.
Are you struggling with the ugly background? Read through the article to learn the simple cut-out image method for various objects. It will help you to derive impressive cutouts without compromising image quality. To save your money, learn the cut-out image method with dedication.
Once you learn the strategy, it generally takes only 15 minutes to do the project. So, win your fear & start learning to derive a perfect photo.
You may read: